How to Configure
DocuSign Integration Setup
- Provide the App Name and select Create App in DocuSign.
- A new Integration Key is generated — store as
DOCUSIGN_INTEGRATION_KEY(Application Constant). - Add additional details and click Save.
- In Service Integration, generate RSA and store the private key as
DOCUSIGN_PRIVATE_KEY(Application Constant). - Add required Redirect URIs, Origin URLs, and Allowed HTTP Methods.
- To start DocuSign, call:
Replace
https://account-d.docusign.com/oauth/auth?response_type=code&scope=signature%20impersonation&client_id={integration_key}&redirect_uri={redirect_uri_specified}{integration_key}and{redirect_uri_specified}as per your App Key.
Notes:
- Embedding signing is used — emails are not sent directly to recipients.
- The application generates the signing URL; the document is signed by the respective signer.
BDM - SuccessFactor Configuration (Config Server)
The application uses Config Server to fetch SuccessFactor details.
| Property | Value |
|---|---|
| Config Server URL | https://cw-caf-configserver-sbx-dev.cfapps.eu10-004.hana.ondemand.com |
| Application Name | bdm-java-dev |
| Details Config File | runtimeConfig/SuccessFactorDetailsConfig.yaml |
| API Config File | runtimeConfig/SuccessFactorApi.yaml |
All APIs written in Postman are available in Config Server. Update the SF API in these files as needed.
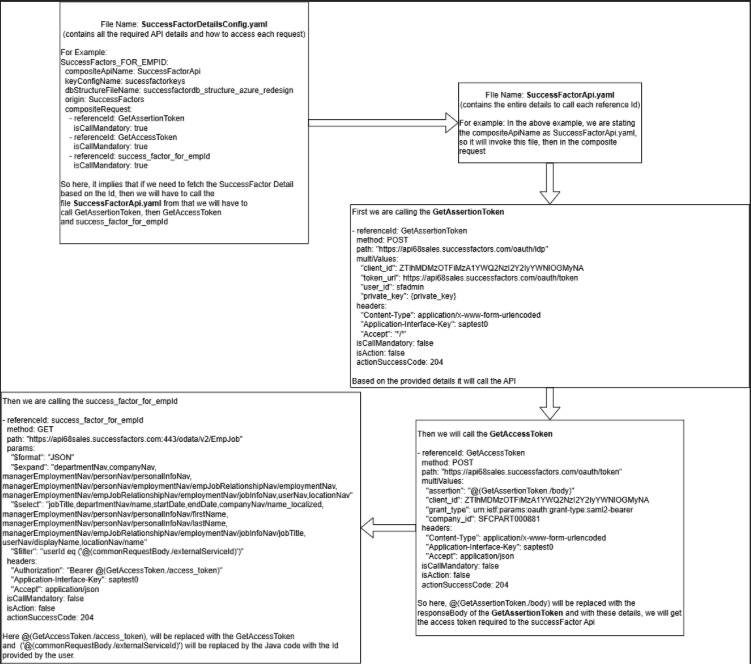
Java Code Flow:
- Fetch the required request from the YAML file (e.g.,
SuccessFactors_FOR_EMPIDfromSuccessFactorDetailsConfig.yaml). - Fetch implementations from the composite API.
- The response is returned from
CompositeOutput().
Generate Token for Application (SAP BTP)
Authorization Token (with user details)
- From XSUAA service → View Credentials → get
urlandclientid. - Form the URL:
{url}/oauth/authorize?response_type=code&client_id={clientid} - Enter user details in the form and fetch the code from the redirect URL.
- Generate the token:
curl --location '{url}/oauth/token' \
  --header 'Content-Type: application/x-www-form-urlencoded' \
  --data-urlencode 'client_secret={clientsecret}' \
  --data-urlencode 'grant_type=authorization_code' \
  --data-urlencode 'response_type=token' \
  --data-urlencode 'client_id={clientid}' \
--data-urlencode 'code={code}' - Decode the token at jwt.io to inspect user details.
Client Credentials Token (no user details)
curl --location '{url}/oauth/token' \
  --header 'Content-Type: application/x-www-form-urlencoded' \
  --data-urlencode 'client_secret={clientsecret}' \
  --data-urlencode 'grant_type=client_credentials' \
  --data-urlencode 'response_type=token' \
  --data-urlencode 'client_id={clientid}'
This generates a token without user details.