IDM 3.0 User Guide
This page explains how end users work with IDM 3.0, starting with login and the Admin Console features used to manage applications, catalogues, action types, and rule structures.
Contents
- Admin Console
- Application
- Global Field Catalogue
- Application Field Catalogue
- Action Type
- Rule Maintenance Set
- Rule Set
- Modelling
- Manage Decision
- Rule Simulation
Requirement and scope
Intelligent Decision Management (IDM) is one of the key solutions in Incture's application suite. IDM helps organizations digitize and automate business scenarios in a user-friendly way by separating decision logic from application logic. It provides a web-based application to define metadata, model decision blocks, author decision rules, and govern those rules for use in business applications.
IDM is an enterprise business rules management product designed to streamline the full lifecycle management of business rules across the enterprise landscape.
Application overview
Application login
IDM uses a secure authentication page as the entry point to the application. Users must provide valid credentials, such as username or email and password, to access the system.
If a user does not have the required IDM role access, the user will see a not-authenticated screen.
After a successful login, the user is taken to the IDM home page.
Admin Console
The Admin Console is used to create and manage core IDM configuration objects. It contains the following submodules:
- Application
- Global Field Catalogue
- Application Field Catalogue
- Action Type
- Rule Set
- Rule Maintenance Set
- Event Logs
By default, when the user opens the Admin Console, the system lands on the Application module.
Application
The Application module is used to create and manage applications within IDM.
When the user opens the module, the Application summary screen displays:
- A list of existing applications
- An option to create a new application
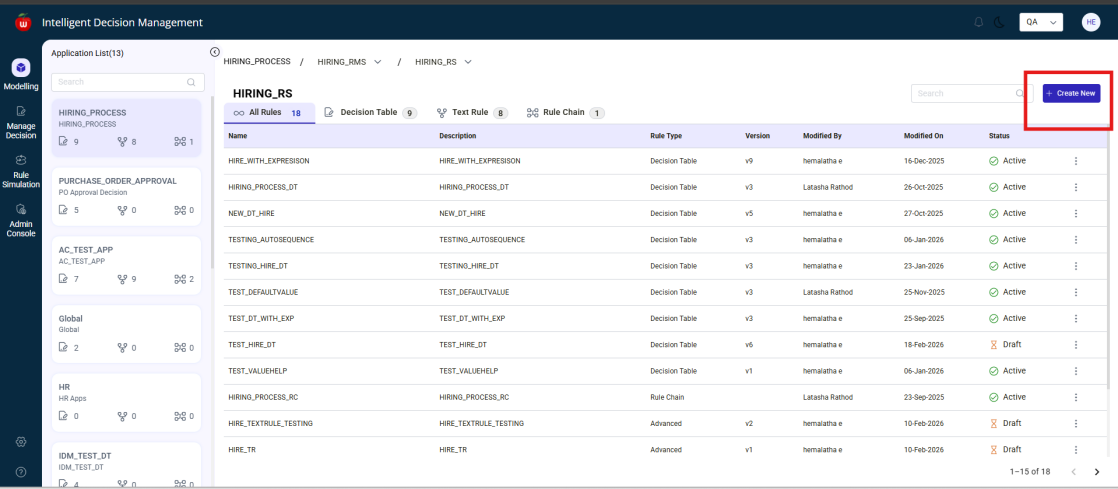
Create a new application
To create an application:
- Click
Create Newon the Application summary screen. - Enter the following fields in the popup:
Name(mandatory)Label(mandatory)Description(optional)
The Continue button remains disabled until Name and Label are entered.
After entering the required details:
- Click
Continue. - The system navigates to the Application Field Catalogue screen.
Application Field Catalogue during application creation
To add field catalogues to the application:
- Click
Add. - A popup displays all existing Application Field Catalogues (AFCs).
- The popup also provides an
Add Newoption.
Add an existing AFC
- Select the required AFC from the list.
- Click
Add. - The selected AFC is added to the application.
Cancel in the add popup
If the user clicks Cancel in the popup:
- The popup closes
- Any current selections are discarded
- No changes are saved
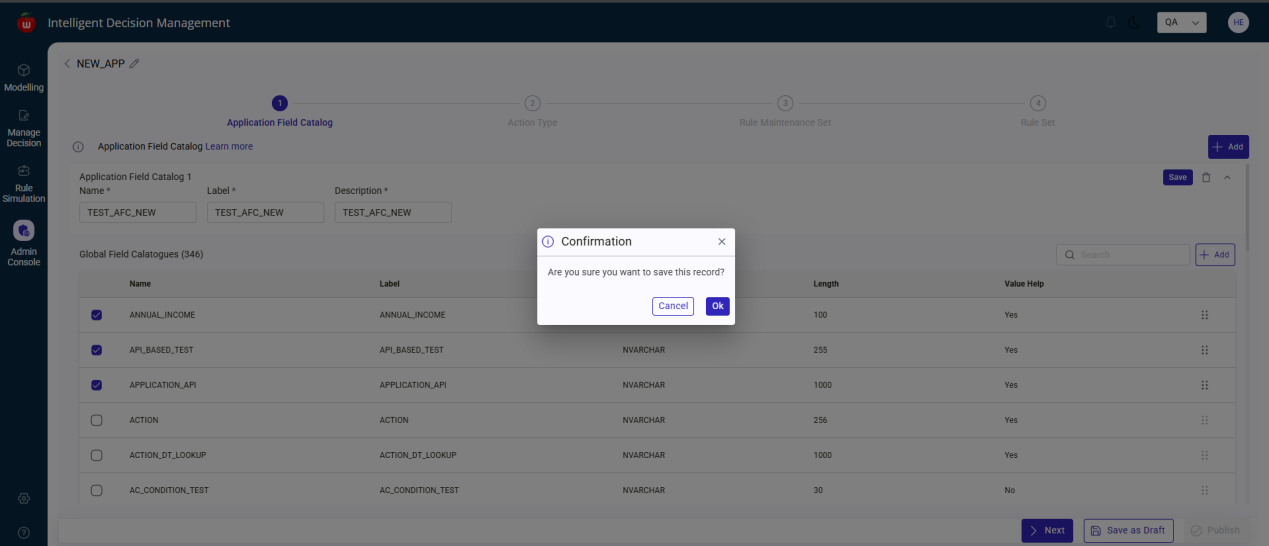
Create a new AFC from application creation
If a new Application Field Catalogue is needed:
- Click
Add New. - Enter:
NameLabelDescription
The screen also displays the list of existing Global Field Catalogues (GFCs).
- Select the required GFCs.
- Click
Save.
A confirmation popup is displayed.
- Click
Confirm.
After confirmation:
- The new AFC is created successfully
- A success message is shown
- The newly created AFC is automatically added to the application
Action Type during application creation
After saving the required Application Field Catalogues:
- Click
Next. - The system navigates to the Action Type screen.
Add an existing Action Type
- Click
Add. - A popup displays all existing Action Types.
- Select the required Action Type.
- Click
Add.
The selected Action Type is added to the application successfully.
Create a new Action Type
- Click
Add Newin the popup. - Enter:
NameLabelDescription
- Click
Save. - A confirmation popup is displayed.
- Click
Ok.
The new Action Type is created and added to the application.
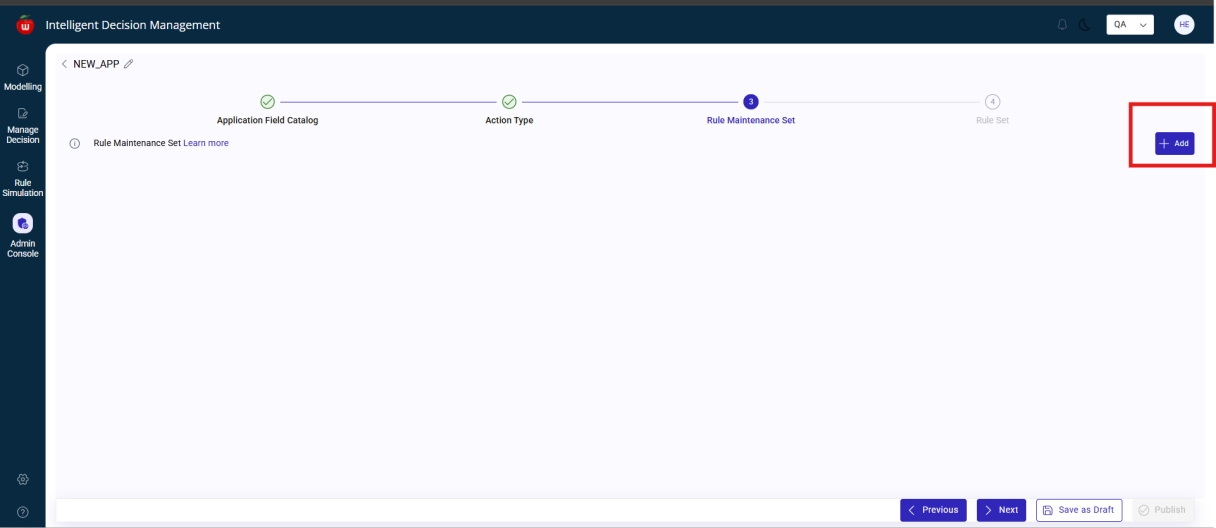
Rule Maintenance Set during application creation
After completing the Action Type configuration:
- Click
Next. - The system navigates to the Rule Maintenance Set screen.
- Click
Add. - Enter:
NameLabelDescription
- Click
Save.
A confirmation popup is displayed.
- Click
OK.
The Rule Maintenance Set is created successfully and a success message is displayed.
Cancel functionality
If the user clicks Cancel, the confirmation popup closes.
Rule Set during application creation
After completing the Rule Maintenance Set configuration:
- Click
Next. - The system navigates to the Rule Set screen.
Add an existing Rule Set
- Click
Add. - A popup displays all existing Rule Sets.
- Select the required Rule Set.
- Click
Add.
The selected Rule Set is added to the application successfully.
Create a new Rule Set
- Click
Add New. - Enter:
Rule Maintenance Setfrom the dropdownNameLabelDescription
The previously created Rule Maintenance Set is available for selection.
- In the Action Types section, select the required action types already configured for the application.
- Click
Save.
After saving, a confirmation message indicates that the Rule Set has been created successfully.
Save the application as draft
After filling the required details:
- Click
Save as Draft. - A confirmation message is displayed.
- Click
OK.
The system returns to the Application summary screen and the application status is displayed as Draft.
Edit and publish a draft application
- On the Application summary screen, click the
Editicon. - The application opens in edit mode.
- Click
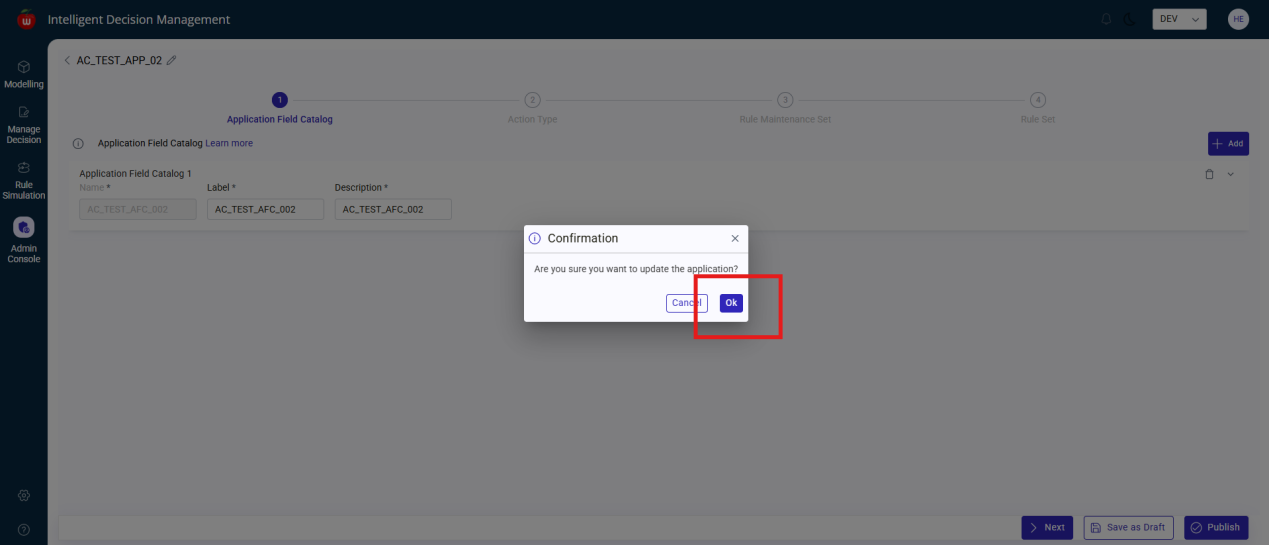
Publish. - A confirmation message is displayed.
After publishing:
- The application is published successfully
- The application status changes to
Active
Global Field Catalogue
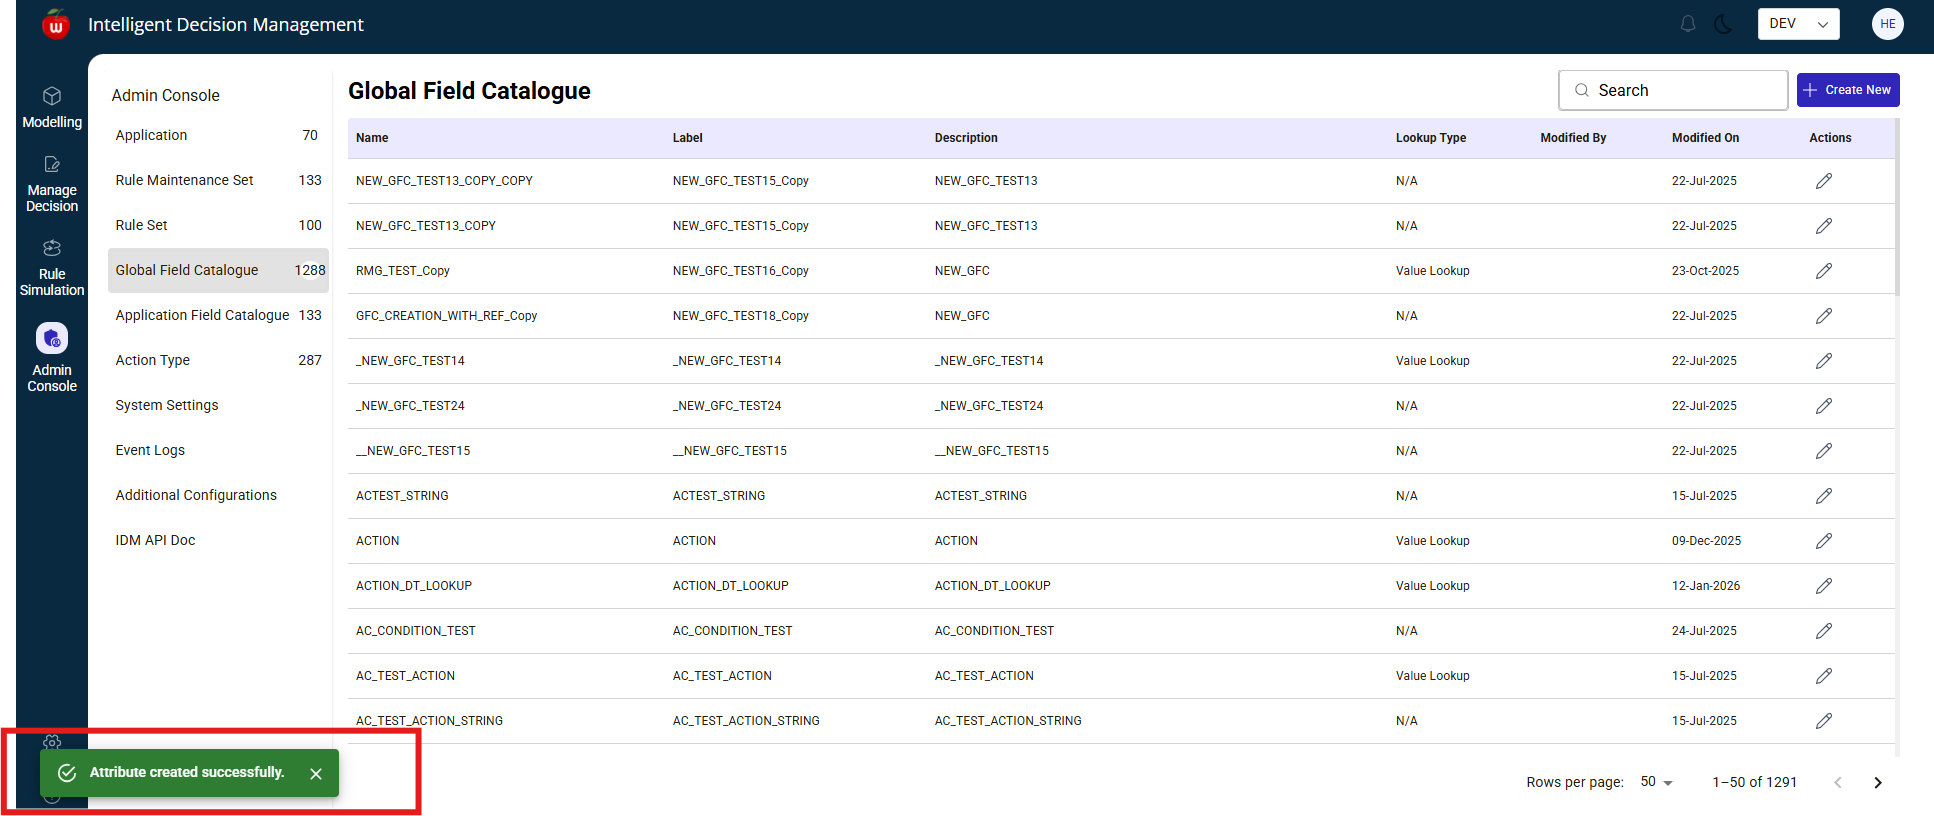
The Global Field Catalogue module is used to create and manage reusable field definitions.
Scenario 1: Create a GFC without value help
- Navigate to
Admin Console. - Select
Global Field Catalogue. - Click
Create New. - Enter:
NameLabelDescription
- In the
Data Elementfield, click the lookup icon. - Select the required Data Element from the list.
- Click
Publish.
A confirmation message is displayed. After confirmation, the GFC is created successfully.
Scenario 2: Create a GFC with static value help
- Navigate to
Admin Console. - Select
Global Field Catalogue. - Click
Create New. - Enter:
NameLabelDescription
- Select the required Data Element using lookup.
- Enable the
Value Helptoggle.
The following options are displayed:
Static Value Help(default)API BasedDB Based
- Keep
Static Value Helpselected. - Enter:
KeyValueAdditional Textif required
- Click
Addto create additional entries.
If required, use Delete next to an entry to remove it.
The system does not allow publishing unless every added entry has both Key and Value.
- Click
Publish.
After confirmation, a success message is displayed and the GFC is created successfully.
Scenario 3: Create an API-based GFC
- Navigate to
Admin Console. - Select
Global Field Catalogue. - Click
Create New. - Enter:
NameLabelDescription
- Select the required Data Element using the lookup.
- Enable the
Value Helptoggle. - Select
API Based.
In the Define URL section, enter:
Destination URLusing the value help iconValue Help URLAPI TypeasRESTorODataMethod TypeasGETorPOSTResponse Pathfor the JSON or XML path
In the Fields section:
- Click
Add. - For the first row, the default GFC name is shown in the
Fieldcolumn and cannot be edited. - Enter the
Display NameandMapped Name. - Click
Previewto preview the added fields. - Click
Publish.
After confirmation, a success message is displayed.
Scenario 4: Create a DB-based GFC
- Navigate to
Admin Console. - Select
Global Field Catalogue. - Click
Create New. - Enter:
NameLabelDescription
- Select the required Data Element using lookup.
- Enable the
Value Helptoggle. - Select
DB Based.
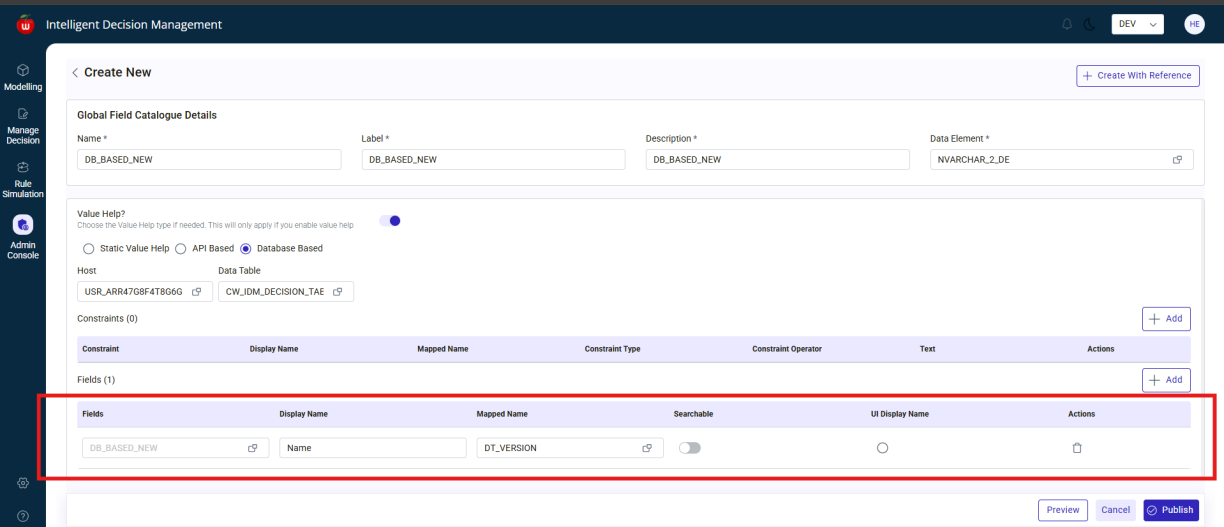
Then configure:
Hostusing value helpData Tableusing value help
In the Fields section:
- Click
Add. - The first field shows the default GFC name and cannot be edited.
- Enter
Display Name. - Select
Mapped Nameusing value help.
To add more fields:
- Click
Addagain. - Enter
Display NameandMapped Namefor each row. - Click
Preview. - Click
Publish.
After confirmation, the DB-based GFC is created successfully.
Search for a GFC
Users can search existing GFCs from the GFC Summary screen:
- Enter the GFC name or part of it in the search field.
- The system displays matching results.
- Select the required GFC to view or edit.
Notes for GFC
- Duplicate GFC names are not allowed
- Users can edit an existing GFC from the summary screen using
Edit - Users cannot publish a GFC unless all mandatory fields are completed correctly
Application Field Catalogue
The Application Field Catalogue module is used to create application-specific catalogue groupings using one or more GFCs.
Create a new AFC
- Navigate to
Admin Console. - Select
Application Field Catalogue. - On the AFC Summary screen, click
Create New. - Enter:
Application Fieldby selecting the application from the dropdownNameLabelDescriptionGFC Selectionby choosing one or more Global Field Catalogues
To save in draft status, click Save as Draft.
To make the AFC active, click Publish.
Delete an AFC
- On the AFC Summary screen, locate the required AFC.
- Click
Delete. - Confirm the deletion.
Behavior:
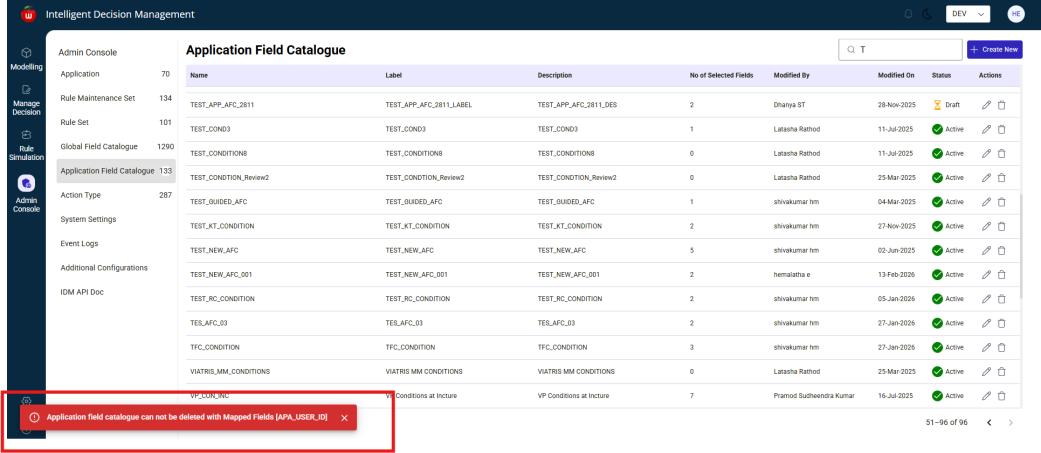
- If the AFC has no mapped GFCs, it is deleted successfully
- If the AFC has mapped GFCs, deletion is blocked and an error message is shown
Edit an AFC
- On the AFC Summary screen, locate the AFC.
- Click
Edit. - Update the required fields.
Users can edit all details except the AFC Name.
- Click
Publish. - Confirm the message.
The AFC is updated successfully.
Notes for AFC
- Duplicate AFC names are not allowed
- Users cannot publish an AFC without completing all mandatory fields
Action Type
The Action Type module is used to manage available action definitions used in rule configuration.
Create a new Action Type
- Navigate to
Admin Console. - Select
Action Type. - The Action Type Summary screen is displayed.
- Click
Create New.
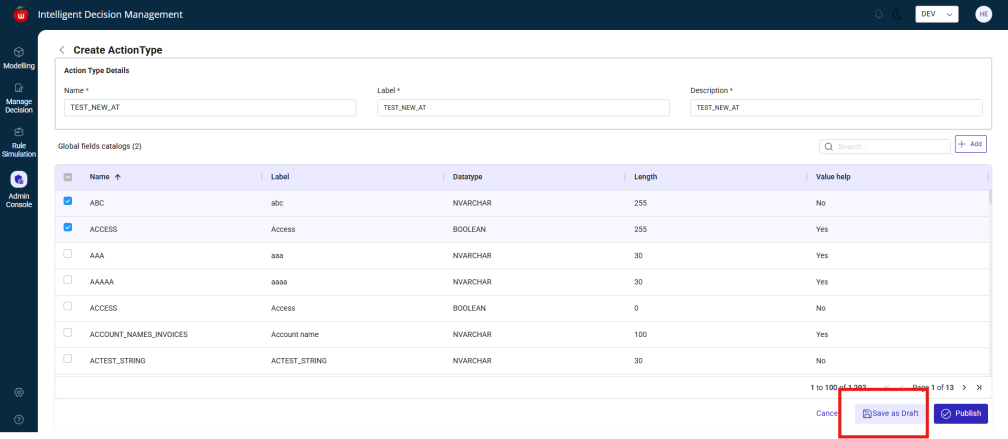
The Create Action Type screen opens.
Fill in:
NameLabelDescriptionGFC Selectionby choosing one or more Global Field Catalogues to map
To save in draft status, click Save as Draft.
To make the Action Type active, click Publish.
Edit an Action Type
- On the Action Type Summary screen, locate the required Action Type.
- Click
Edit. - Update the required fields.
Users can edit all details except the Action Type Name.
- Click
Publish. - Confirm the message.
The Action Type is updated successfully.
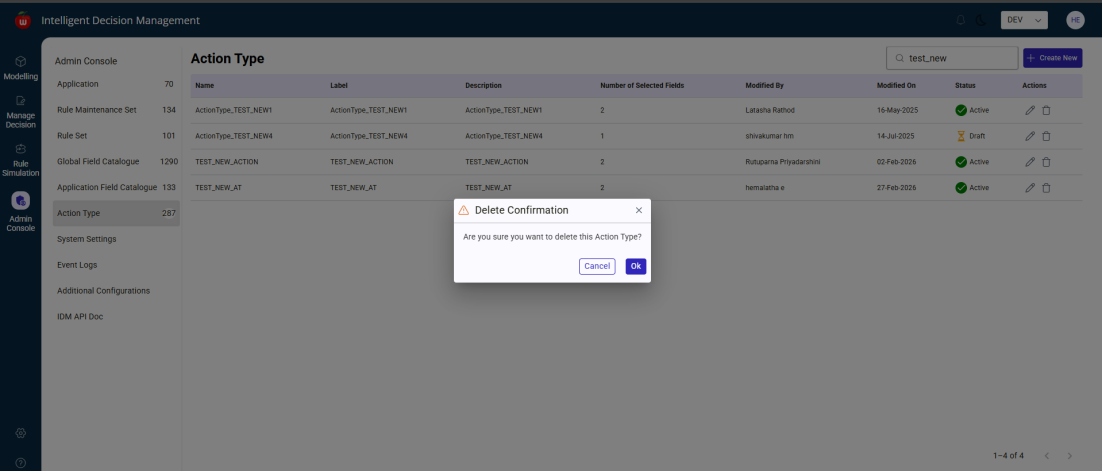
Delete an Action Type
- On the Action Type Summary screen, locate the required Action Type.
- Click
Delete. - Confirm the deletion.
Behavior:
- If the Action Type has no mapped GFCs, it is deleted successfully
- If the Action Type has mapped GFCs, deletion is blocked and an error message is shown
Search for an Action Type
- Use the search field on the Action Type Summary screen.
- Enter the Action Type name or part of it.
- Matching results are displayed below the search bar.
- Select an Action Type from the results to view, edit, or delete it.
Notes for Action Type
- Duplicate Action Type names are not allowed
- Users cannot publish an Action Type without completing all mandatory fields
Rule Maintenance Set
The Rule Maintenance Set module is used to group and manage related rule sets for an application.
Create a new Rule Maintenance Set
- Navigate to
Admin Console. - Select
Rule Maintenance Set. - The RMS Summary screen is displayed.
- Click
Create New.
The Create Rule Maintenance Set screen opens.
Fill in:
Applicationby selecting the application from the dropdownNameLabelDescriptionMapped Rule Setsoptionally by selecting one or more existing rule sets
- Click
Publish.
A confirmation message is displayed indicating the Rule Maintenance Set was created successfully.
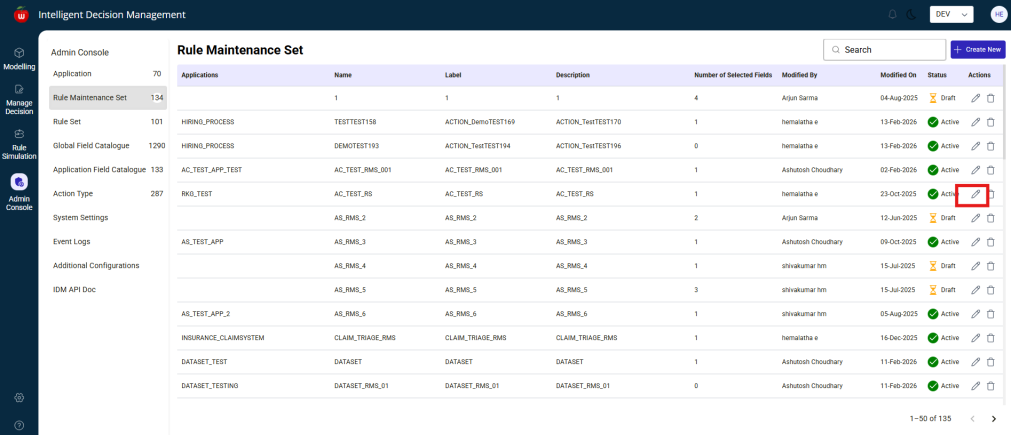
Edit a Rule Maintenance Set
- On the RMS Summary screen, locate the required RMS.
- Click
Edit. - Update the required fields.
Users can edit all details except the RMS Name.
- Click
Publish.
A confirmation message indicates that the RMS has been updated successfully.
Delete a Rule Maintenance Set
- On the RMS Summary screen, locate the required RMS.
- Click
Delete. - Confirm the deletion.
Behavior:
- If the RMS has no mapped rule sets, it is deleted successfully
- If the RMS has mapped rule sets, deletion is blocked and an error message is shown
Search for a Rule Maintenance Set
- Use the search field on the RMS Summary screen.
- Enter the RMS name or part of it.
- Matching results are displayed below the search bar.
- Select an RMS from the results to view, edit, or delete it.
Notes for Rule Maintenance Set
- Duplicate RMS names are not allowed
- Users cannot publish an RMS without completing all mandatory fields
Rule Set
The Rule Set module is used to define the field and action structure used by modelled rules.
Create a new Rule Set
- Navigate to
Admin Console. - Select
Rule Set. - The Rule Set Summary screen is displayed.
- Click
Create New.
The Create Rule Set screen opens.
Configure:
Rule Maintenance SetNameLabelDescription- Required fields in the Fields section
- The appropriate Action Type to map to the Rule Set
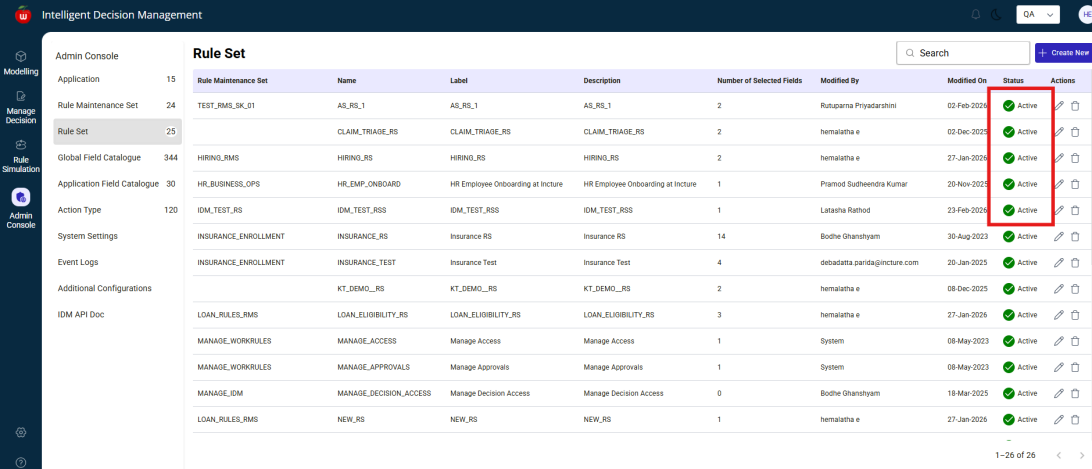
To save in draft status, click Save as Draft.
A confirmation message indicates the Rule Set was saved as draft.
To make the Rule Set active, click Publish.
A confirmation message indicates the Rule Set was created successfully and is now active.
Edit a Rule Set
- On the Rule Set Summary screen, locate the required Rule Set.
- Click
Edit. - Update the required fields.
Users cannot edit:
Rule Maintenance SetName
- Click
Publish. - Confirm the message.
The Rule Set is updated successfully.
Delete a Rule Set
- On the Rule Set Summary screen, locate the required Rule Set.
- Click
Delete. - Confirm the deletion.
The Rule Set can be deleted only when there are no mapped fields. If mapped fields exist, deletion is blocked and an error message is shown.
Notes for Rule Set
- Duplicate Rule Set names are not allowed
- Users cannot publish a Rule Set without completing all mandatory fields
Rule Maintenance SetandNamecannot be edited after creation
Modelling
The Modelling module is used to create and configure Decision Tables, Text Rules, and Rule Chains.
Navigate to Modelling
- Log in to IDM.
- Click
Modelling. - The Modelling screen is displayed.
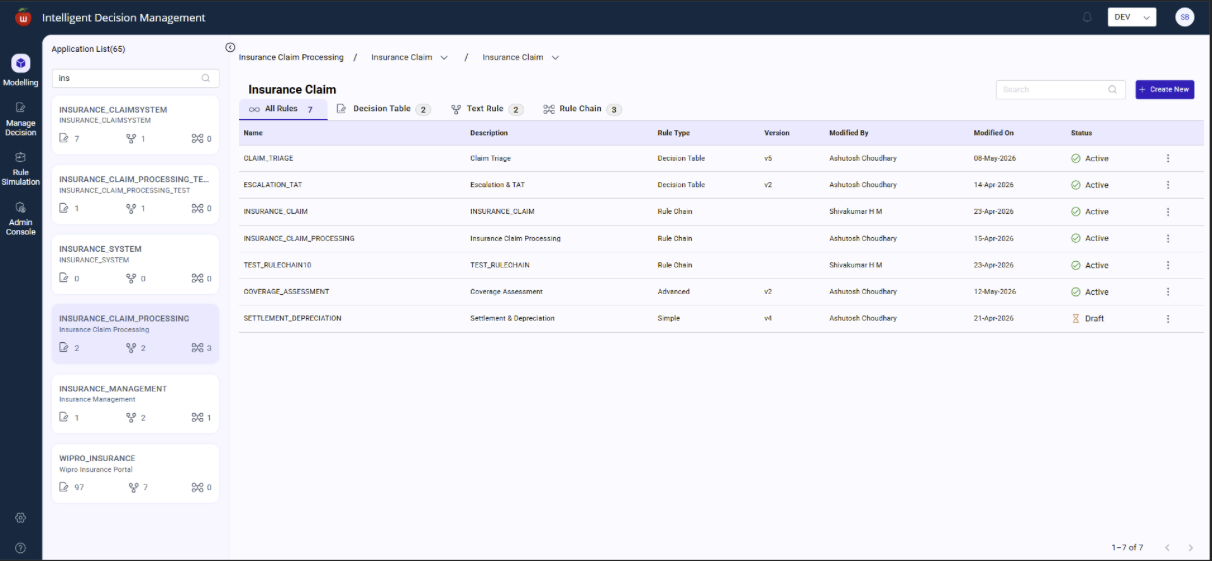
On the left panel, users can view all existing applications.
After selecting an application:
- The top section displays linked Rule Maintenance Sets and their Rule Sets
- The breadcrumb shows the current path as
Application Name > RMS Name > RS Name
Create a Decision Table
- Navigate to
Modelling. - Select an application.
- The following tabs are displayed:
All RulesDecision TablesTextRulesRule Chain
The count of rules is displayed in each tab.
- Click
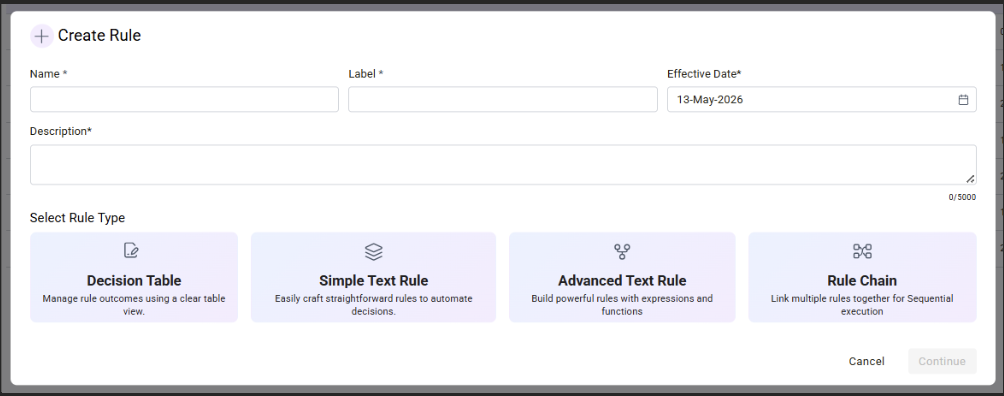
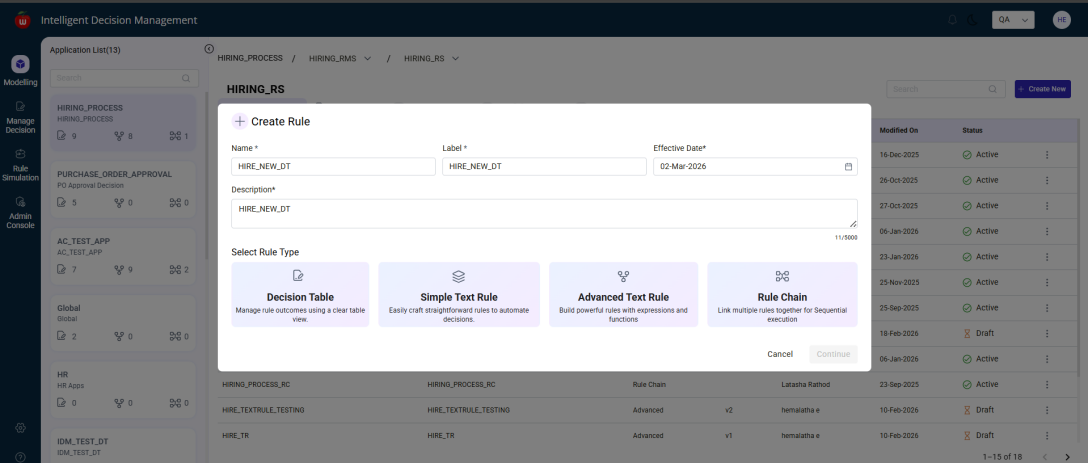
Create New. - In the Create Rule popup, enter:
NameLabelEffective DateDescription
- Select the required Rule Type as
Decision Table. - Click
Continue.
Decision Table configuration
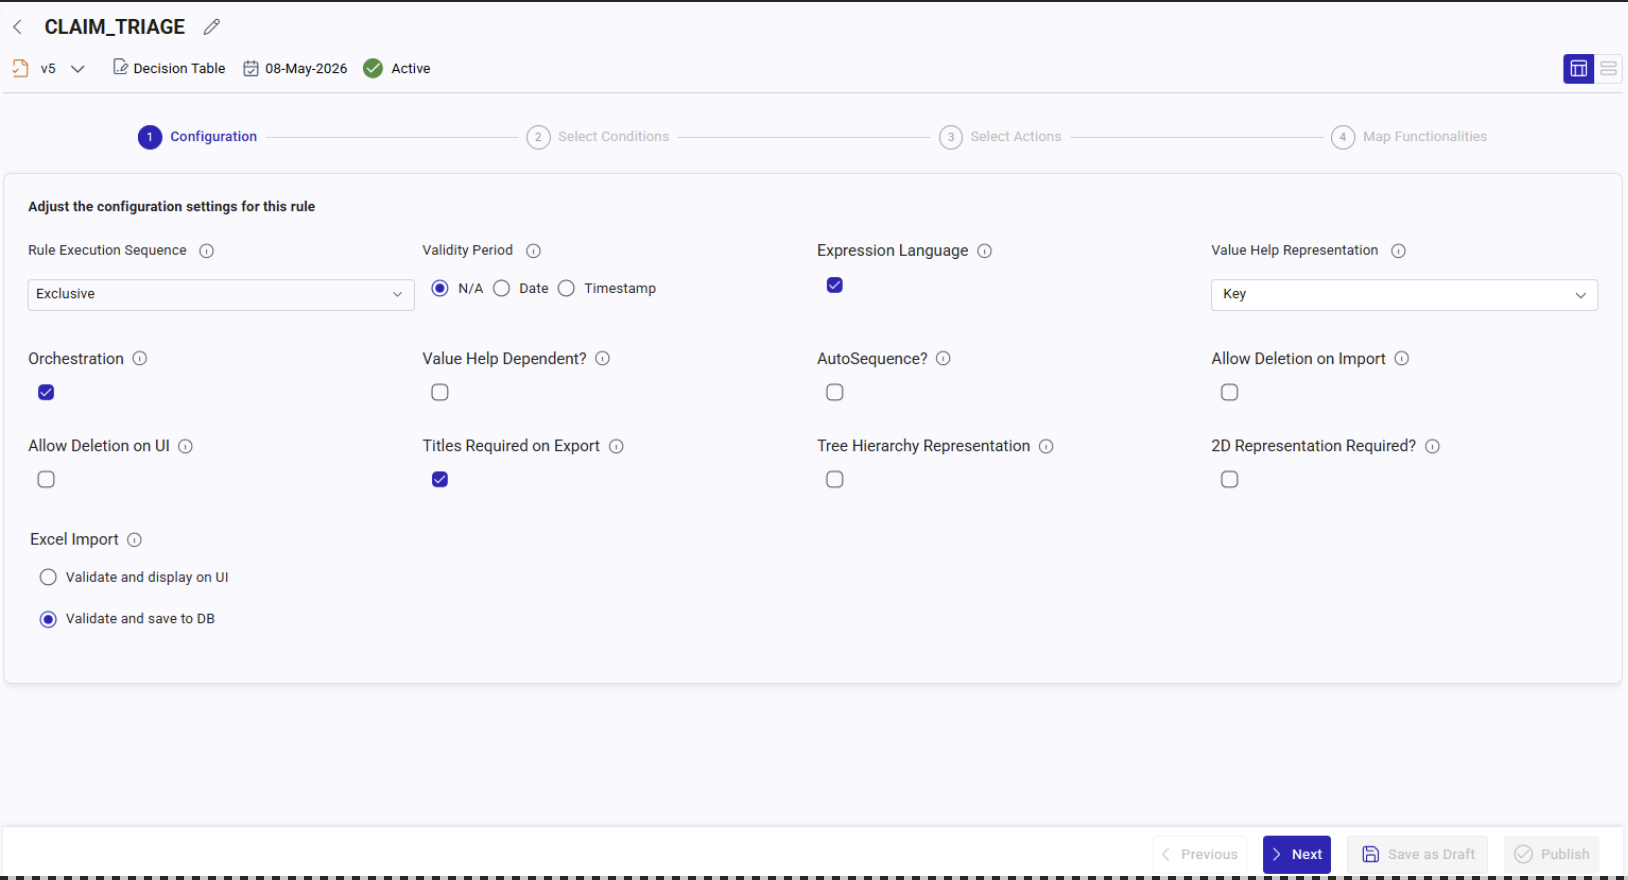
After clicking Continue, the system navigates to the Configuration section.
Rule Execution Sequence
By default, the Rule Execution Sequence is Exclusive.
Available options:
Exclusive: displays only the first or best matching resultInclusive: displays all matching resultsUnique: displays exactly one unique matching recordCollect: aggregates results for action fields
Only one option can be selected at a time.
Restrict Duplicates
This field appears when Inclusive is selected.
Available options:
NoneConditions OnlyConditions and Actions
Validity Period
Users must choose one option:
DateTimestampN/A
Behavior:
Date: users select a valid dateTimestamp: users select both date and timeN/A: no validity value is required
Only one radio button can be selected at a time.
Additional configuration options
Expression Language: enables expression entry when selectedValuehelp Dependent: enforces field dependencies in Manage DecisionOrchestration: enables input and output field selection and rule chainingTree Hierarchy Representation: creates the Decision Table in tree view instead of standard tabular formatValue Help Representation: controls how value help is shown, defaulting to key-value formatTitles Required on Export: includes titles in exported Excel filesAutosequence: enables auto-sequence support for integer and decimal fieldsExcel Import Options: allows eitherValidate and Display on UIorValidate and Save to DB
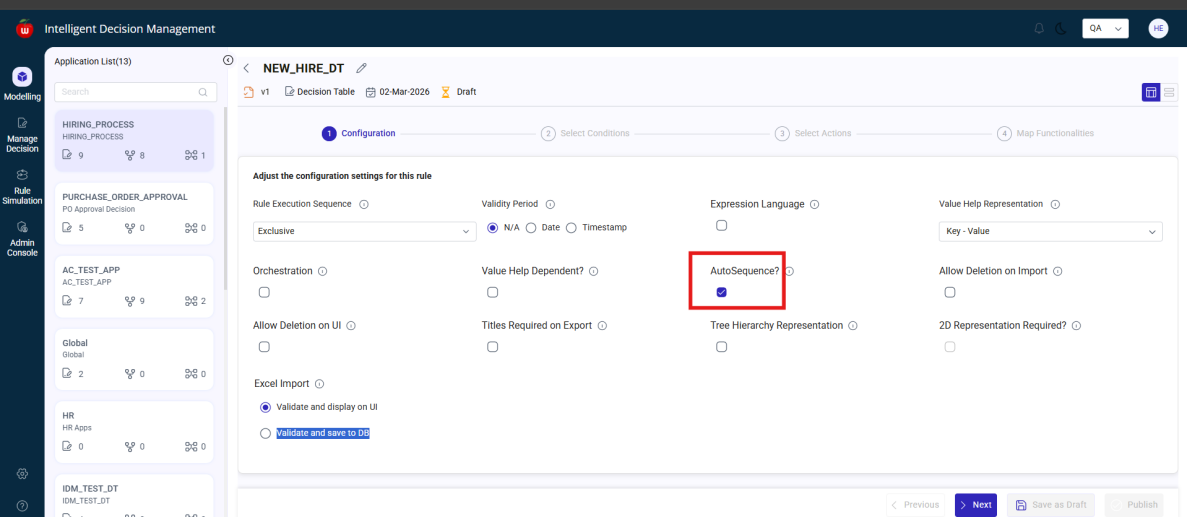
Decision Table field selection flow
- After completing Configuration, click
Next. - In
Conditions, select one or more conditions.
You cannot proceed to Actions without selecting at least one condition.
- Click
Next. - In
Actions, select the required actions. - Click
Nextto openMap Functionalities.
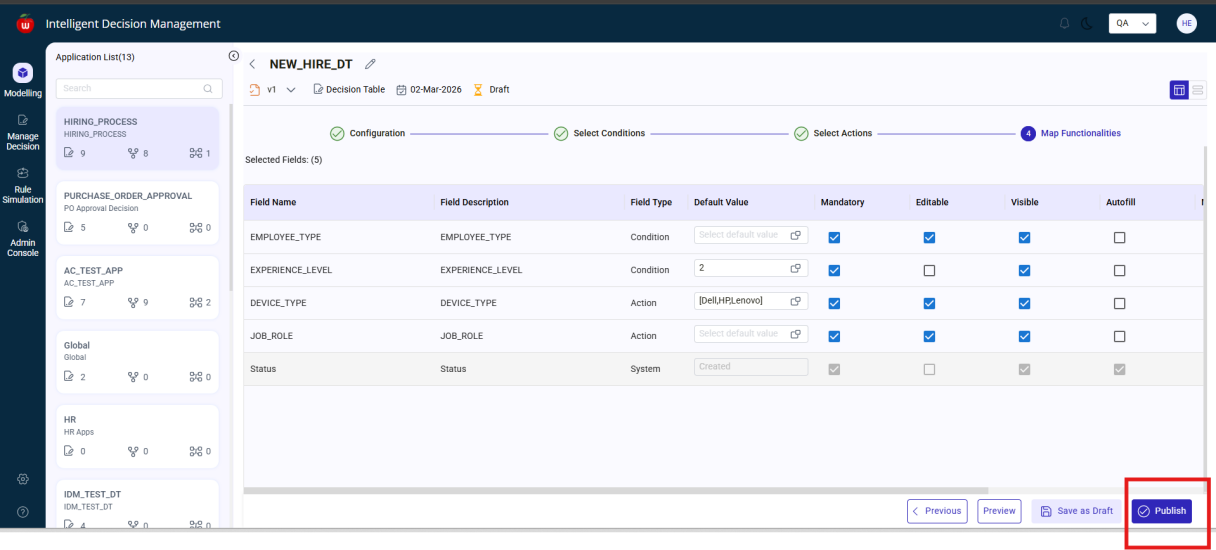
Map Functionalities for Decision Table
Users can configure field-level settings such as:
Default ValueEditableMandatoryVisibleMultiselectEditable on UpdateEditable on ExportAutosequence
Behavior:
- If
Editableis deselected, the field cannot be edited in Manage Decision - If
Editableis deselected,Default Valuebecomes mandatory - If
Mandatoryis selected, the field must be filled - If
Visibleis deselected, the field is hidden in Manage Decision - If
Multiselectis enabled, multiple values can be selected - If
Editable on Updateis disabled, the field cannot be changed after creation - If
Editable on Exportis disabled, the field is not editable in exported Excel
Preview, save draft, and publish a Decision Table
After configuration:
- Click
Previewto see the configured Decision Table. - Click
Save as Draftto store the Decision Table in draft status. - From the summary screen, click
Editon the draft Decision Table. - Click
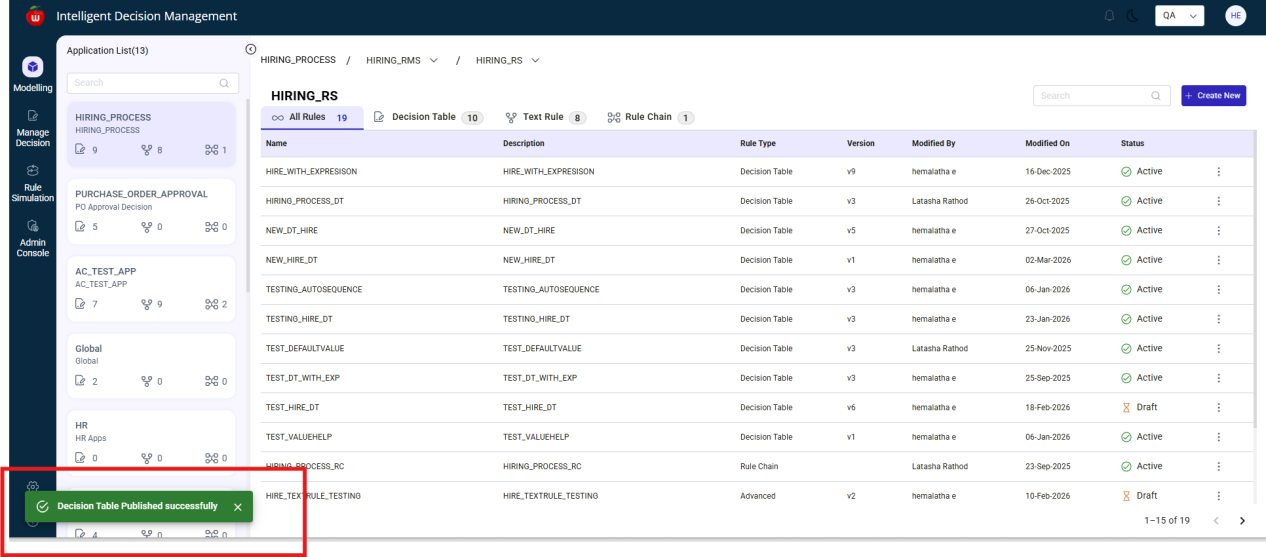
Publish.
After confirmation, the Decision Table status changes to Active.
Create a Text Rule
- Navigate to
Modelling. - Select an application.
- Open
Text Rules. - Click
Create New. - Enter:
NameLabelEffective DateDescription
- Select the Rule Type as
SimpleorAdvanced. - Click
Continue.
Configuration flow:
- Select the Rule Execution Sequence.
- Optionally enable
Titles Required on Export. - Click
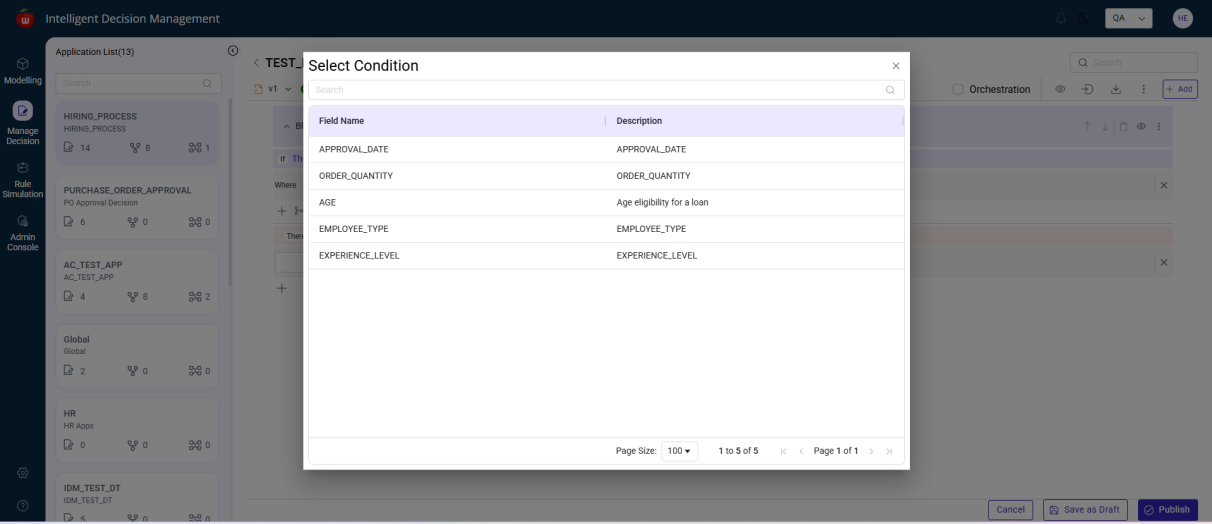
Nextto move toConditions. - Select one or more conditions.
- Click
Nextto move toActions. - Select the required actions.
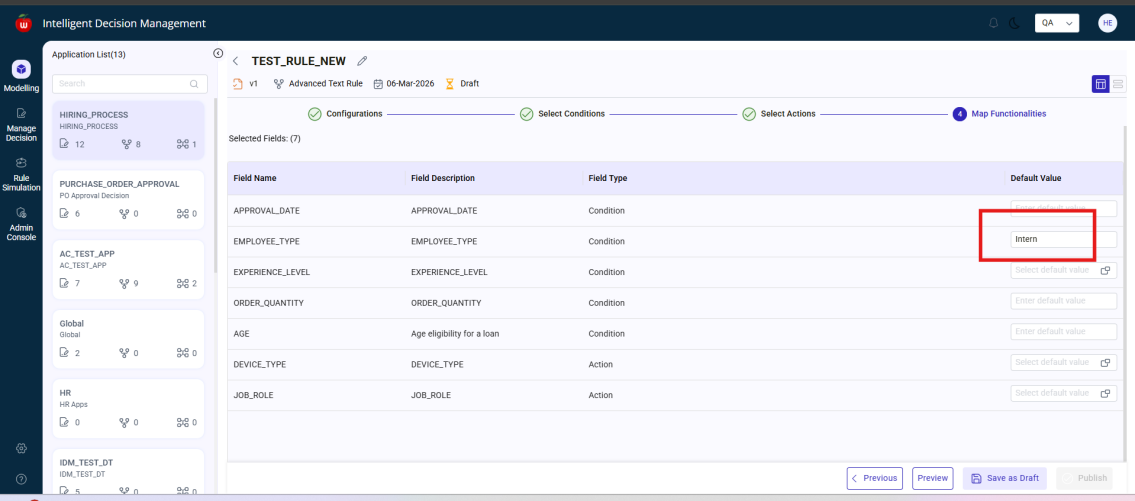
- Click
Nextto move toMap Functionalities. - Enter default values if needed.
- Click
Preview. - Click
Save as Draft.
To publish:
- Return to the summary screen.
- Click
Edit. - Open the Text Rule.
- Click
Publish.
Manage blocks in a Text Rule
Users can:
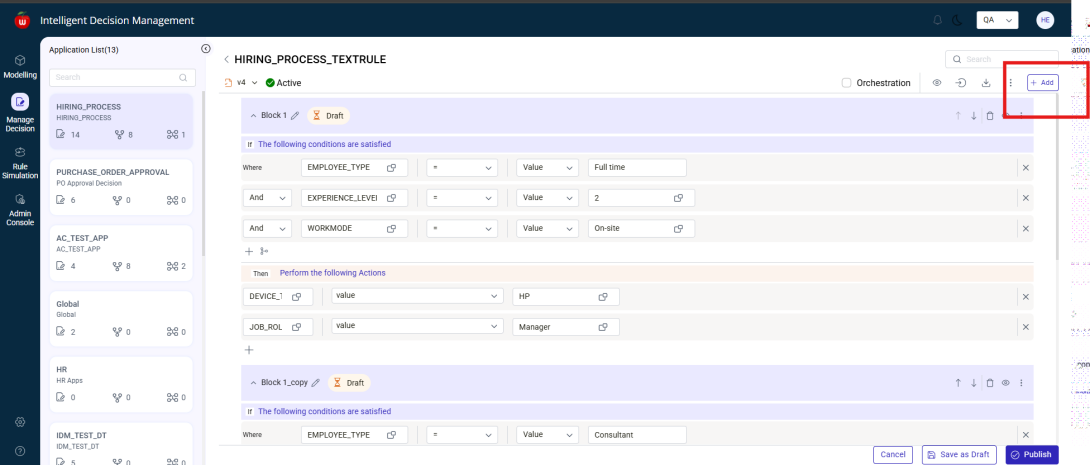
- Add a new block using
Add - Edit a block name using the edit icon
- Delete a block using
Delete - View block expressions using the expression icon
- Copy and paste blocks using the three-dot menu
- View audit history using
Audit Log - Export blocks using the export icon
- Import blocks through the three-dot menu
- View
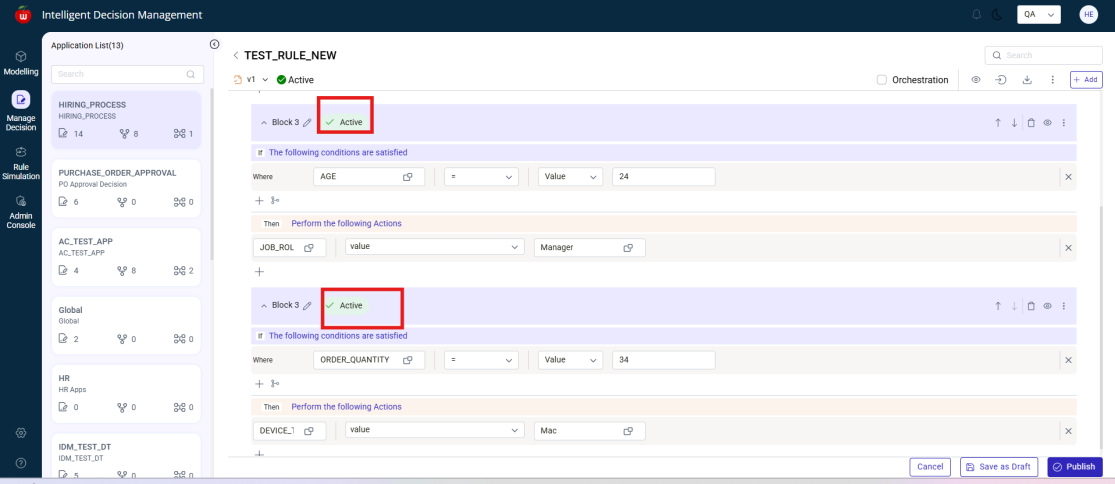
Activity Log - Set or remove a default block
- Save blocks as draft
- Publish draft blocks
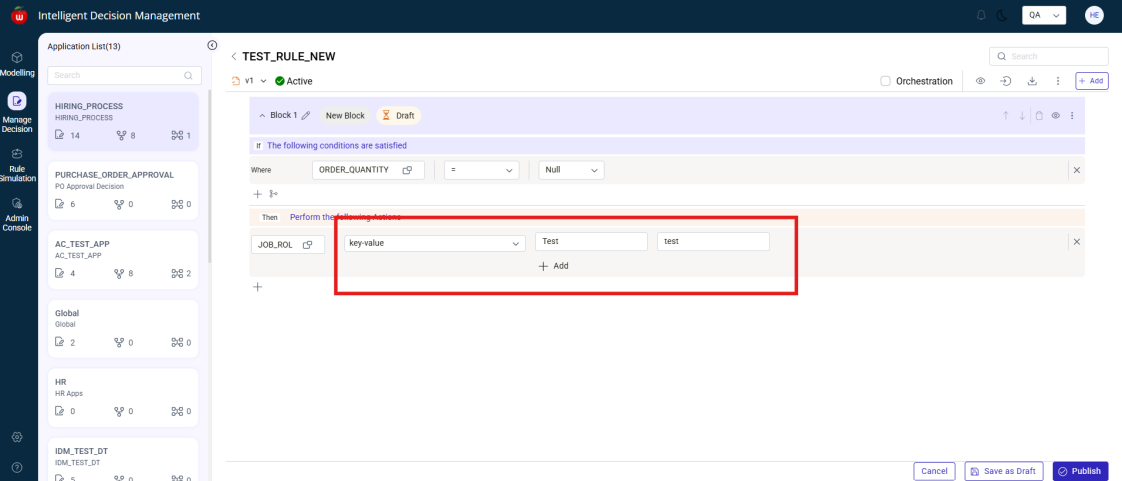
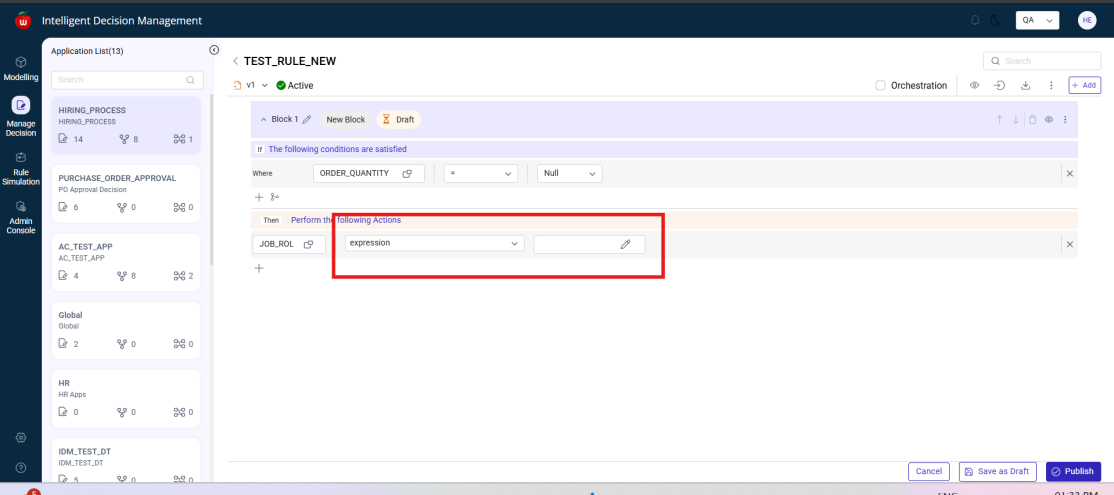
Text Rule notes:
- In Simple Text Rule, condition value types such as
Value,Variable,Expression, andNullare not available - Simple Text Rule has limited advanced condition handling
- Simple Text Rule supports an
ELSEoption in the Actions section - Advanced Text Rule supports richer condition and action configuration
Create a Rule Chain
- Navigate to
Modelling. - Select an application.
- Click
Create New. - Enter:
NameLabelDescriptionEffective Date
- Select Rule Type as
RuleChain. - Click
Continue.
The Rule Chain workspace opens and allows drag-and-drop configuration.
Users can create Rule Chains using:
- Decision Tables
- Simple or Advanced Text Rules
- A combination of Decision Tables and Text Rules
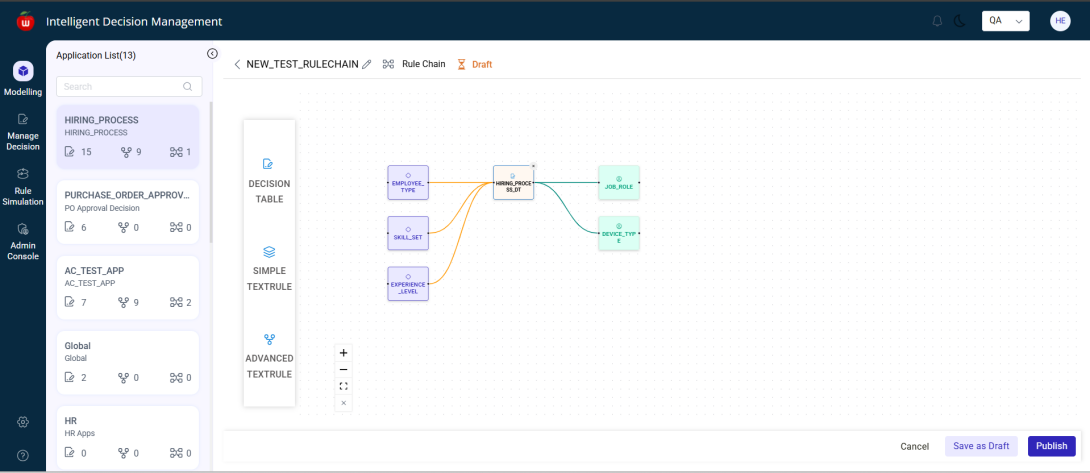
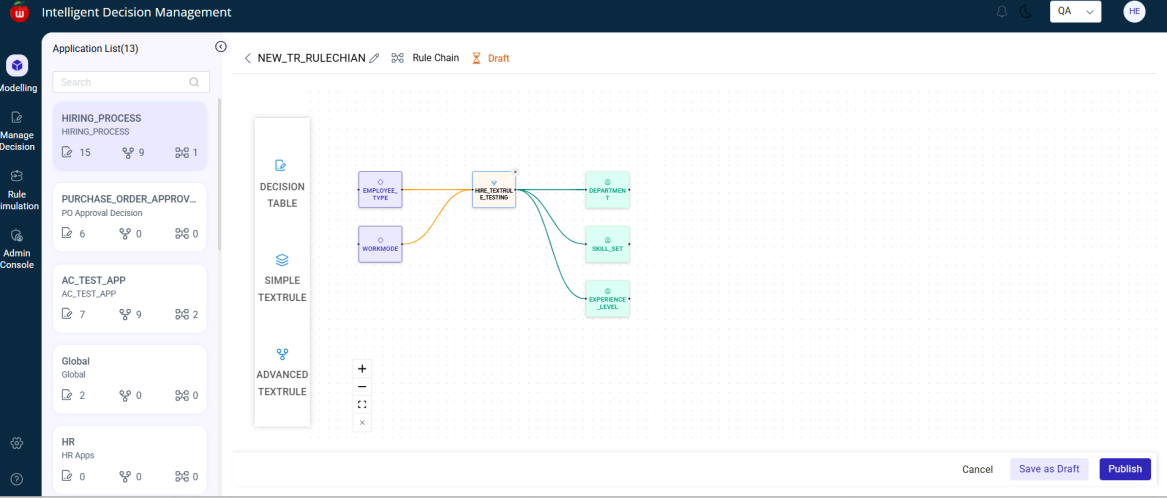
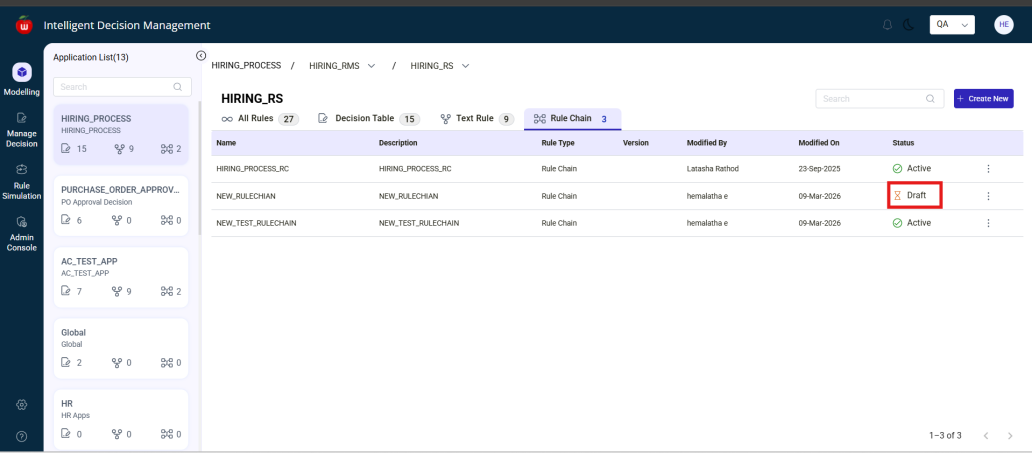
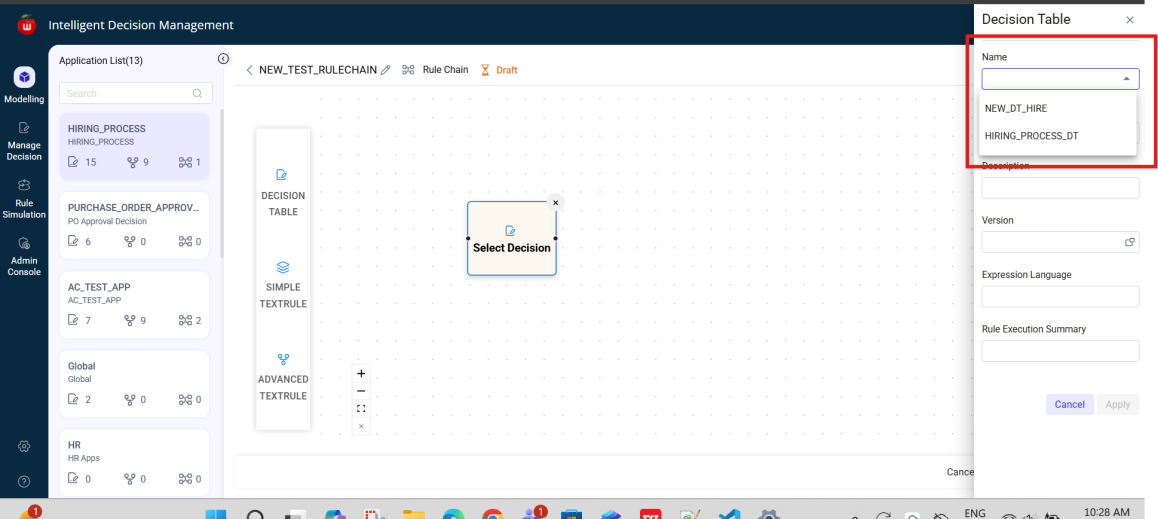
When configured nodes share a common node, the system connects them automatically. If not, the system displays No Common Node.
To save:
- Click
Save as Draft. - Confirm the message.
The Rule Chain status is set to Draft.
To publish:
- Open the Rule Chain from the summary screen using
Edit. - Click
Publish. - Confirm the message.
The Rule Chain status changes to Active.
Manage Decision
The Manage Decision module is used to maintain active Decision Tables and Text Rules after they are published from Modelling.
Navigate to Manage Decision
- Open IDM.
- Click
Manage Decision. - The Manage Decision screen is displayed.
Only active Decision Tables are displayed in this module.
View applications, RMS, and Rule Sets
On the left panel:
- Applications are displayed
- Selecting an application shows Rule Sets under the selected RMS
Displayed columns include:
NameDescriptionRule TypeVersionRule / BlockModified ByModified On
Tabs and search
Available tabs:
All RulesDecision TableText Rule
Search behavior:
- Exact matches are shown for full rule names
- Partial matches are supported
- If nothing matches,
No record foundis displayed
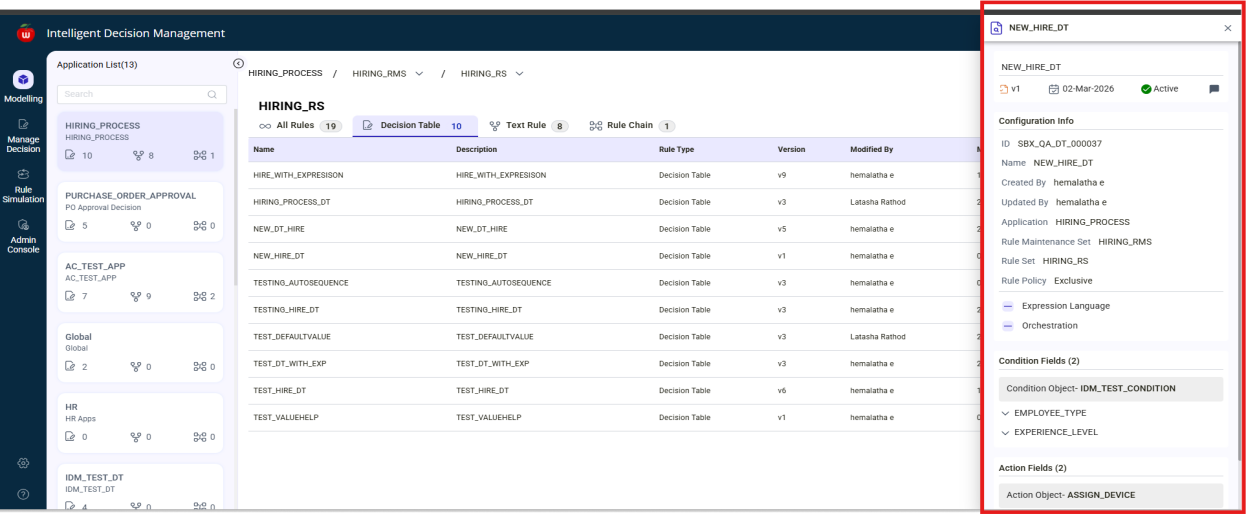
View rule details
- Locate the required rule.
- Open the three-dot menu.
- Select
Details.
A side panel opens and displays complete rule details.
Manage records in a Decision Table
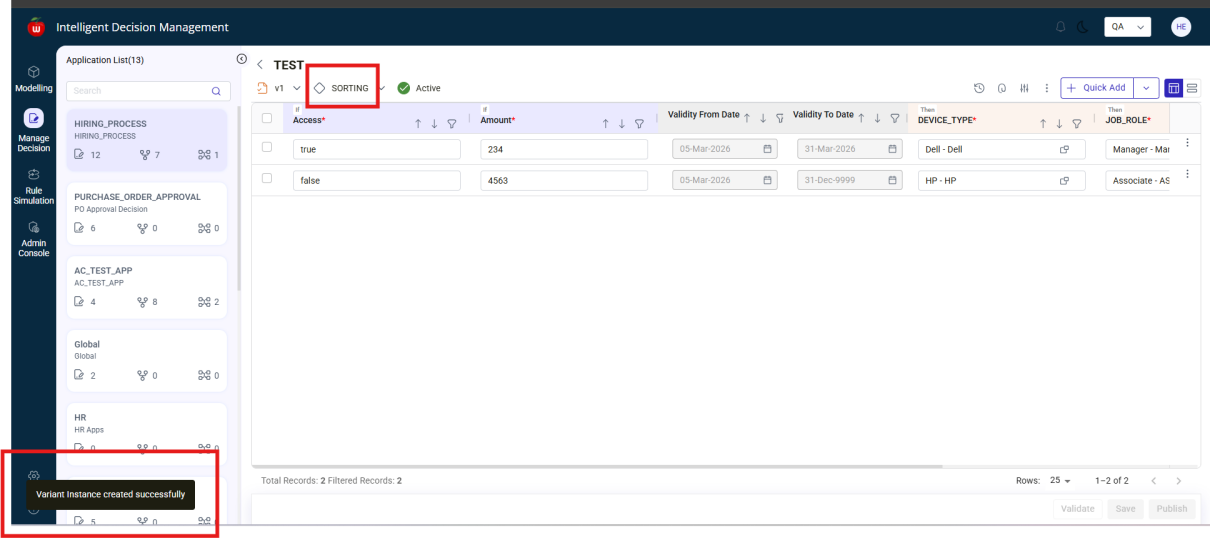
To edit a Decision Table:
- Locate the required Decision Table.
- Open the three-dot menu.
- Select
Edit.
Users can then manage records as defined by the Decision Table configuration.
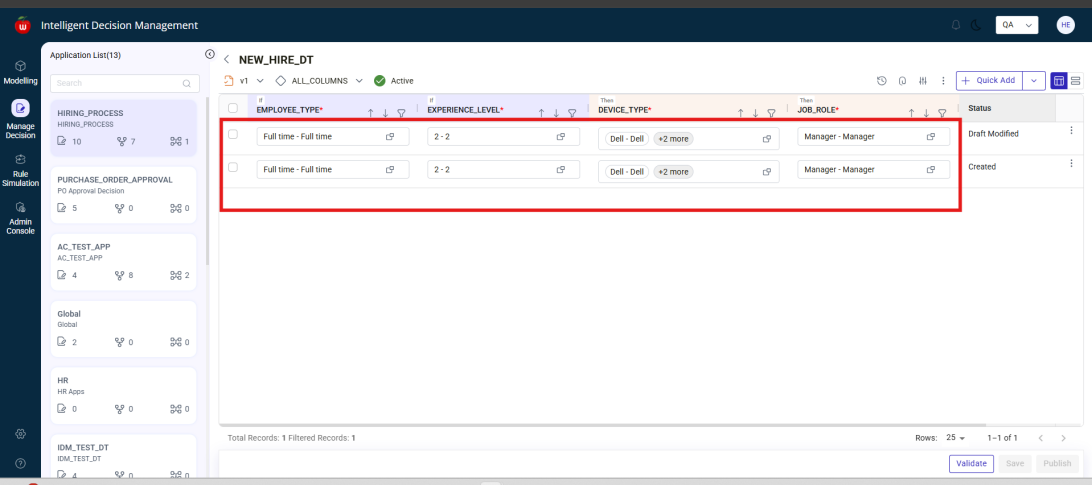
Add a record
- Click
Quick Add. - A new row is added.
- Enter the required field values.
- Click
Validate. - If validation succeeds, click
Done. - Click
Save.
Status behavior:
- After adding a record, status is
Created - After validation and save, status becomes
Draft Created
Field behavior:
- Lookup-enabled fields use value help
- Non-lookup fields require manual entry
Autosequenceauto-populates sequence valuesDefault Valueis auto-filled when configuredMultiselectallows multiple selections- Mandatory fields must be filled before validation
Edit a record
- Open the Decision Table in edit mode.
- Update the required values.
- Click
Validate. - Click
Save.
If a field is not editable or not editable on update, it cannot be changed.
After saving, the status changes to Draft - Modified.
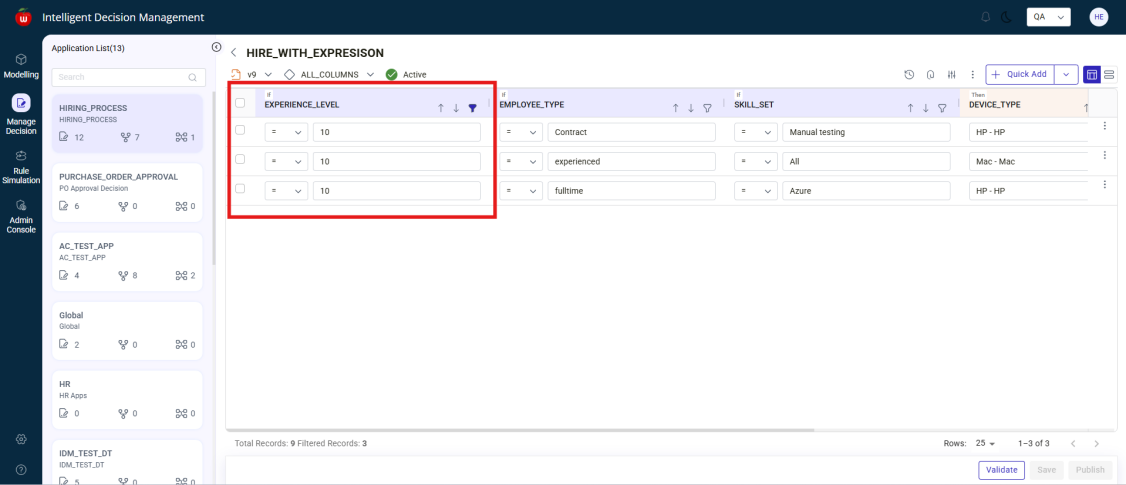
Delete a record
- Select the required record.
- Click
Delete. - Confirm the deletion.
The record is removed successfully.
Duplicate record handling
If a newly entered record matches an existing active record:
- The system does not allow two active duplicate records
- The existing active record is deactivated
- The new record is added with the latest details
Copy and paste records
- Open the Decision Table in edit mode.
- Use the three-dot menu on a row.
- Select
Copy. - Choose
Paste BeforeorPaste After. - Click
Validate. - Click
Save.
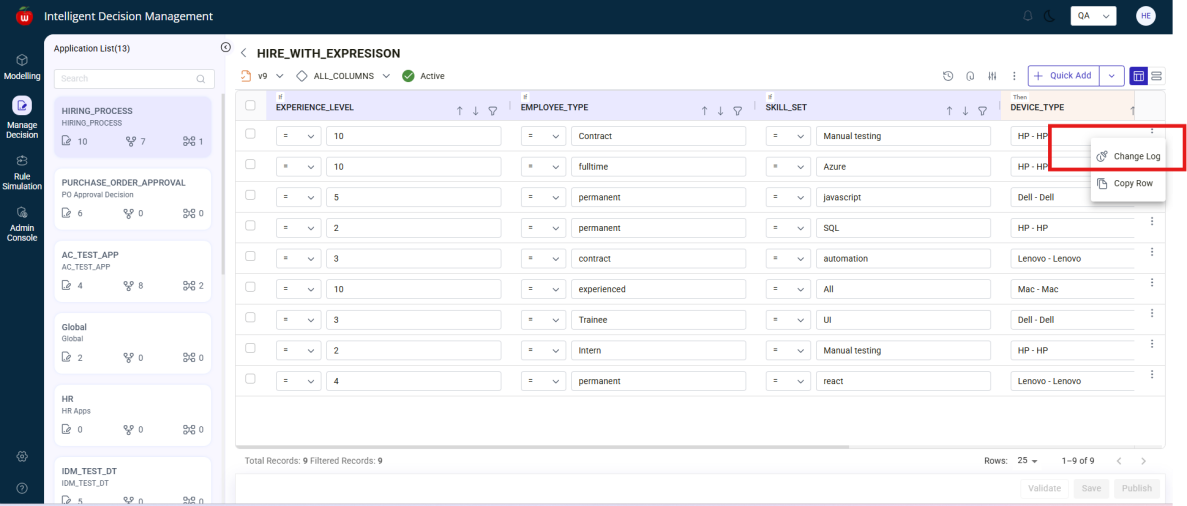
View Change Log
- Open the row-level three-dot menu.
- Select
Change Log.
The log shows:
- Updated field values
- User who made the change
- Date and time of the change
View Activity Log
- Open the required Decision Table.
- Click
Activity Log.
Tracked activities include:
- Record Added
- Record Validated
- Record Saved
- Record Deleted
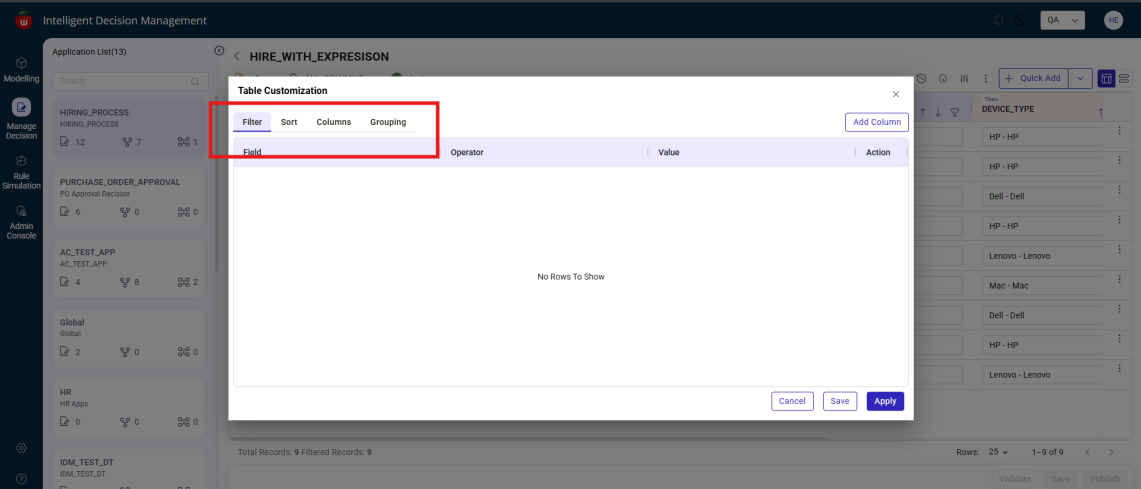
Table customization and variants
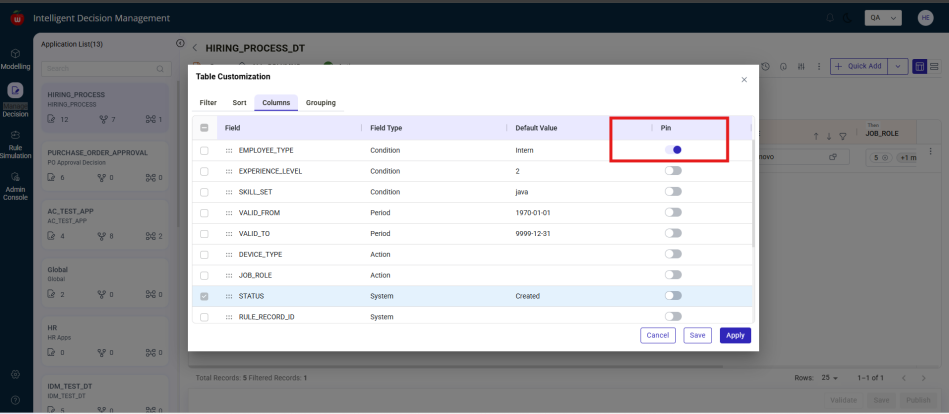
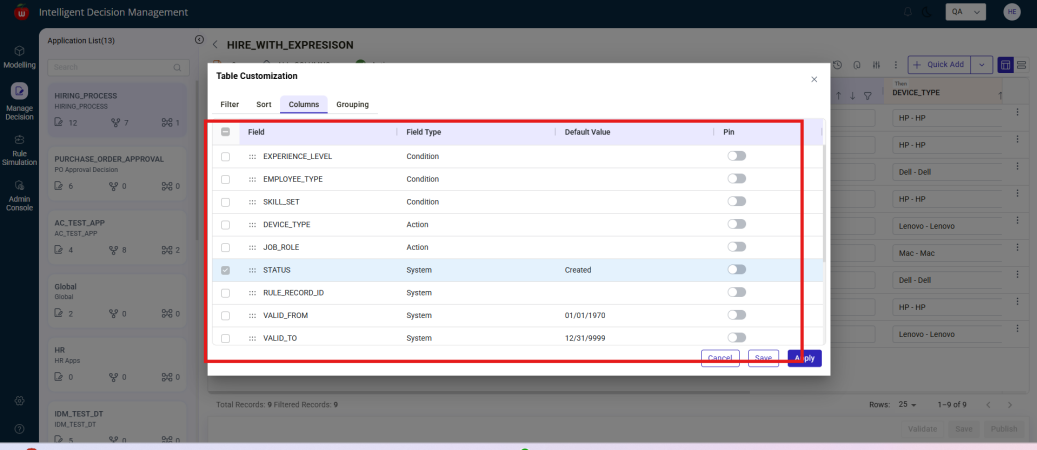
The Table Customization popup supports:
ColumnsFilterGroupingSort
Users can:
- Pin columns
- Filter records
- Sort records
- Save these configurations as variants
- Set variants as default or global
Export and import Decision Tables
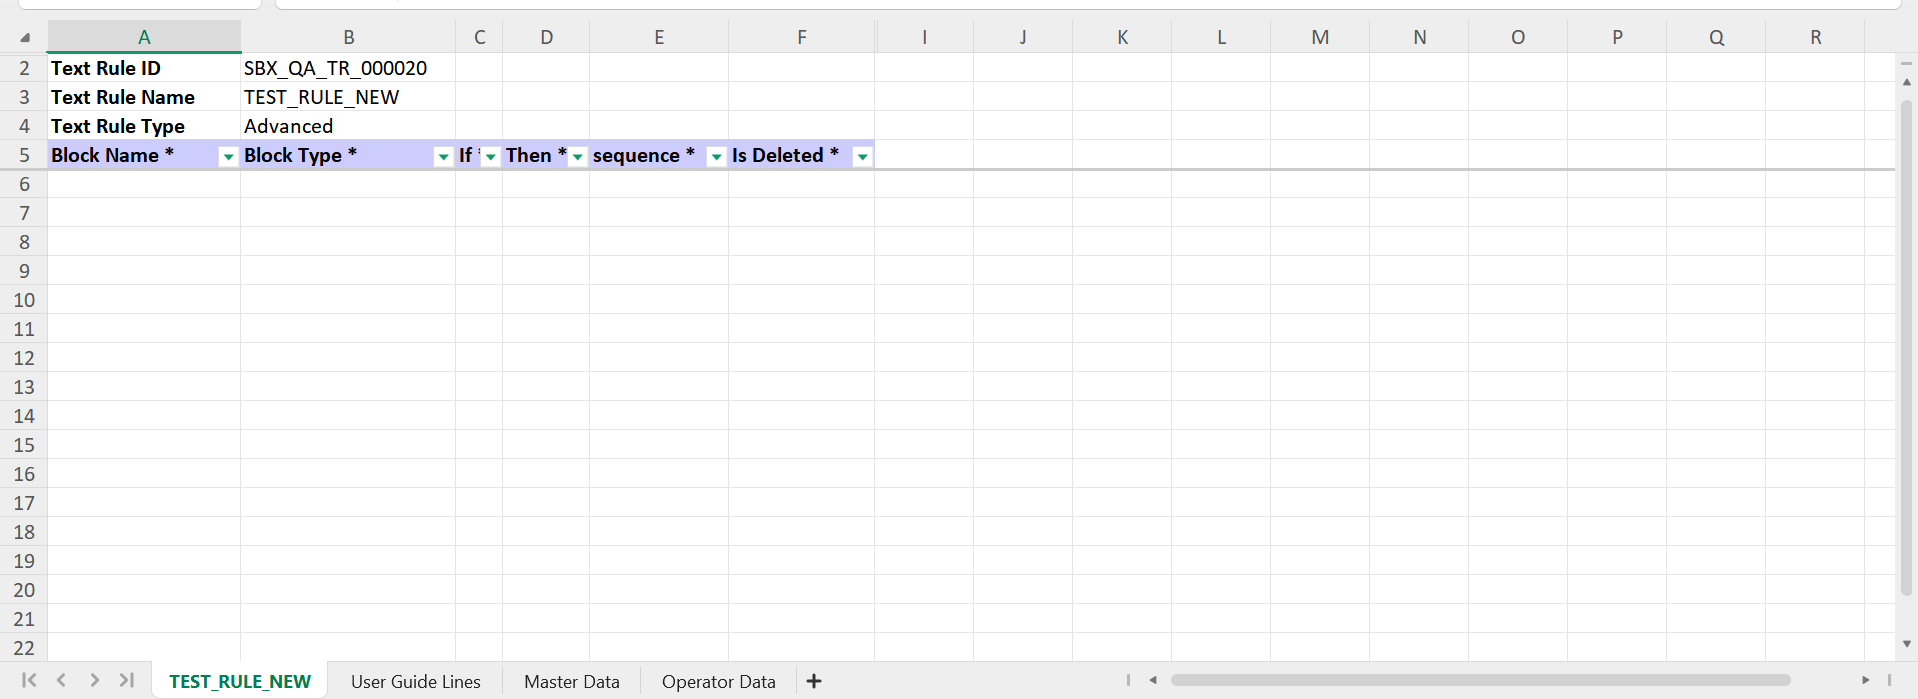
Users can export:
- Decision Table template
- Decision Table data
Users can also import Decision Tables by selecting the Excel file through the three-dot menu and uploading a valid sheet with all mandatory fields completed.
Static view
Users can open the static view of a Decision Table from Manage Decision.
Manage Text Rules
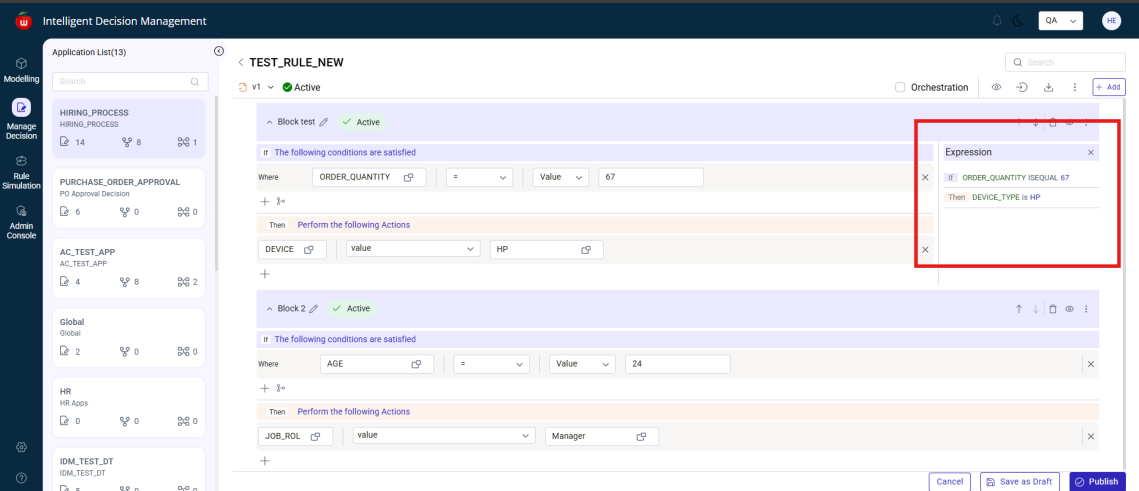
For Text Rules in Manage Decision, users can:
- Edit conditions and actions
- Choose value types such as
Value,Variable,Expression,Null,Object, orKey-Valuewhere supported - Add multiple conditions and actions
- Use
ANDandORlogic between conditions - Add, edit, copy, paste, export, import, and delete blocks
- View block audit and activity logs
- Set a block as default or remove default
- Save blocks as draft
- Publish draft blocks
Rule Simulation
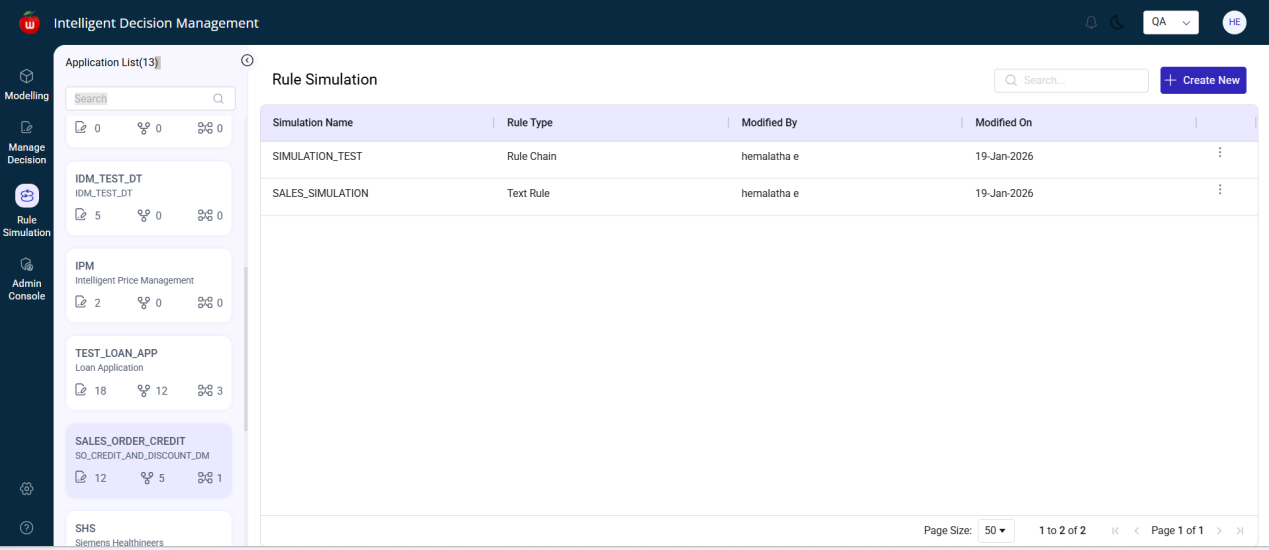
The Rule Simulation module is used to test active Decision Tables, Text Rules, and Rule Chains before productive use.
Open Rule Simulation
- Click
Rule Simulation. - The Rule Simulation Summary screen is displayed.
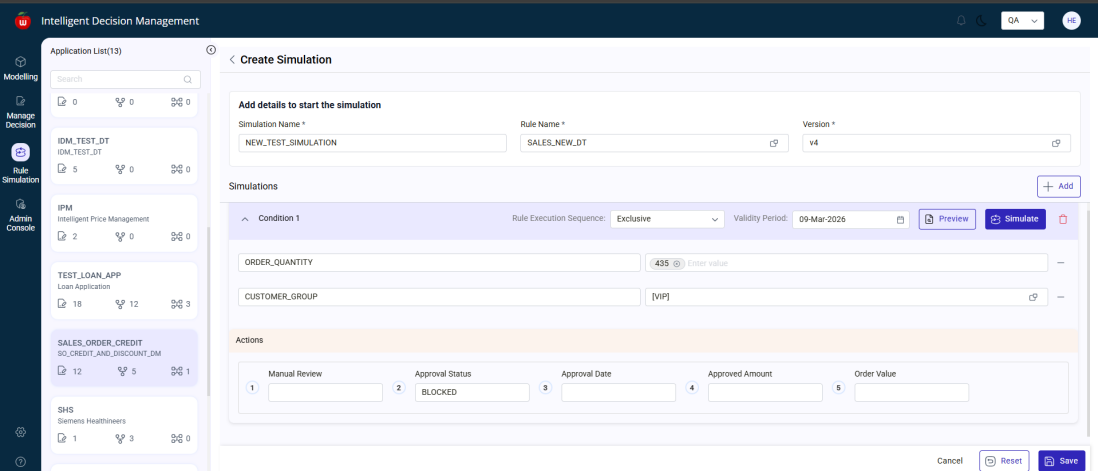
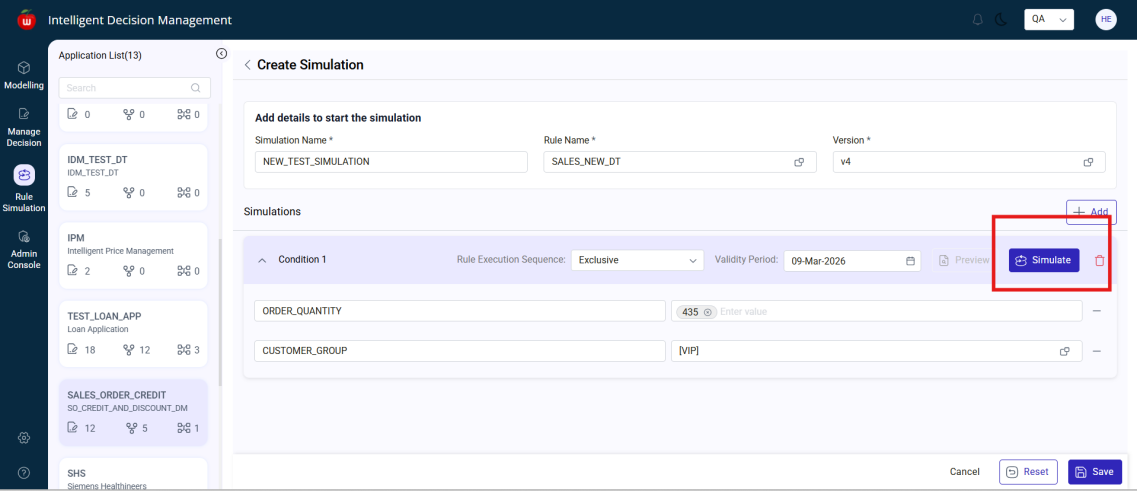
Create a new Rule Simulation for a Decision Table
- On the Rule Simulation Summary screen, click
Create New. - The Create Rule Simulation screen is displayed.
- Enter the simulation name in the
Namefield. - In the
Rule Namefield, click value help. - A lookup window displays all active rules.
- Select the required Decision Table.
After the rule is selected:
- The latest version is shown by default in the
Versionfield - If a different version is needed, use value help in
Versionand select the required version
- Click
Add.
The available Decision Table conditions are displayed.
- Enter or select valid values in the condition fields.
- If a condition is not needed, click
Remove (-)to remove it. - Click
Simulate.
Behavior:
- If the entered values are valid, the system simulates the rule and displays the corresponding actions
- If no rule condition matches, the system displays
No actions displayed
- Click
Previewto view the Decision Table preview. - Click
Save. - Confirm the message.
The simulation is saved successfully.
Simulate a Simple Text Rule or Advanced Text Rule
- Open
Rule Simulation. - Click
Create New. - Enter the simulation name in the
Namefield. - In
Rule Name, click value help. - Select the required Simple Text Rule or Advanced Text Rule from the list of active rules.
After selection:
- The latest version is shown by default
- If a different version is needed, use value help in the
Versionfield
- Click
Add. - The available conditions are displayed.
- Enter valid values in the condition fields.
- Remove unnecessary conditions using
Remove (-)if required. - Click
Simulate.
Behavior:
- If the entered values are valid, the system displays the corresponding actions
- If the values do not match the rule logic, the system displays
No actions displayed
- Click
Previewto view the rule preview. - Click
Save. - Confirm the message.
The rule simulation is saved successfully.
Simulate a Rule Chain
- Open
Rule Simulation. - Click
Create New. - Enter the simulation name in the
Namefield. - In
Rule Name, click value help. - Select the required Rule Chain from the list of active rules.
- Click
Add.
The available conditions for the Rule Chain are displayed.
- Enter or select values for the required conditions.
- Click
Simulate.
The available actions are displayed.
- Click
Previewto view the selected rule. - Click
Save. - Confirm the message.
The Rule Simulation is created successfully.
Rule Content Packaging
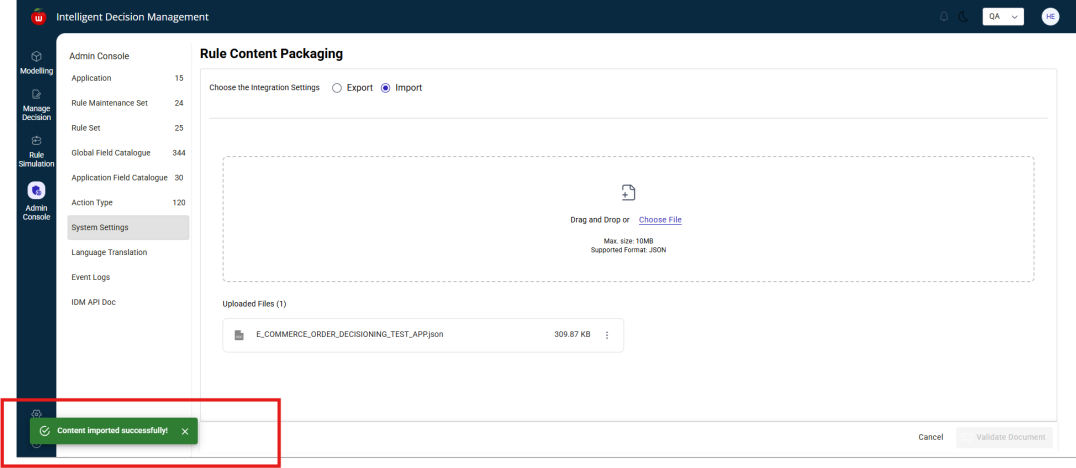
Rule Content Packaging is available from Admin Console > System Settings and is used to export or import application configuration and rule content as JSON.
Open Rule Content Packaging
- Click
Admin Console. - Select
System Settings. - The system navigates to the Rule Content Packaging screen.
Export an application with rule data
- In Rule Content Packaging, keep
Exportselected. - In
Selected Application, choose the application to export. - In
Export Application, selectFull Application with Rule Data.
The system displays the full application content, including:
- Rule Maintenance Sets
- Rule Sets
- Decision Tables
- Text Rules
- Rule Chains
The displayed rule data is read-only.
Users can:
- Click the eye icon beside a Decision Table to view its records
- Click the eye icon beside a Text Rule to view its blocks
- Click
Export as JSON. - Confirm the export.
The system exports the full application along with rule data as a JSON file.
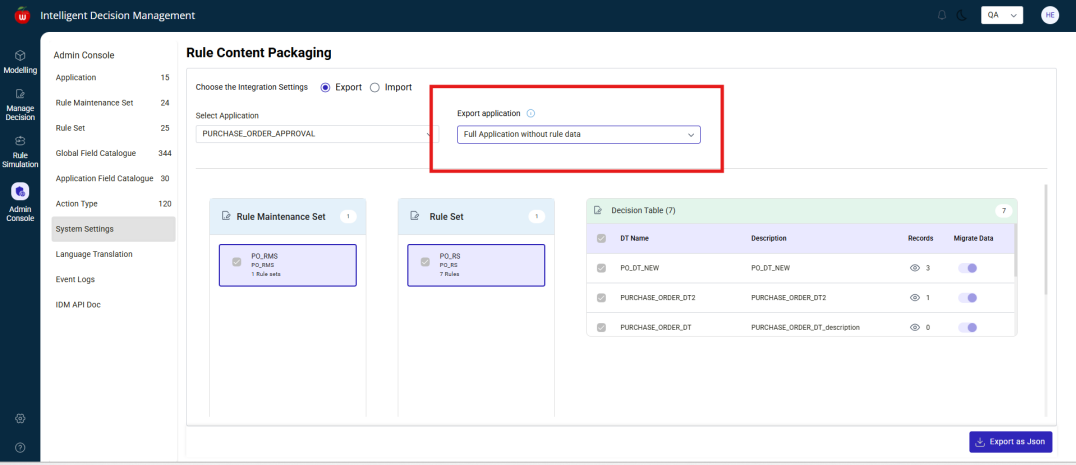
Export an application without rule data
- Open
Admin Console > System Settings. - Keep
Exportselected. - Choose the required application in
Selected Application. - In
Export Application, selectFull Application without Rule Data.
The system displays the application structure in read-only mode, including:
- Rule Maintenance Sets
- Rule Sets
- Decision Tables
- Text Rules
- Rule Chains
Users can still preview Decision Table records and Text Rule blocks using the eye icon.
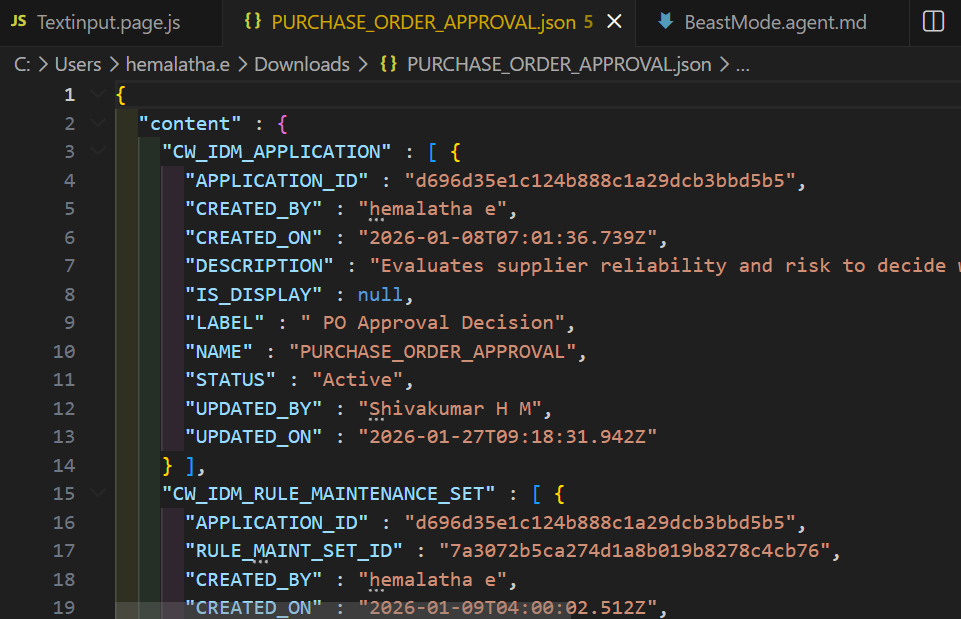
- Click
Export as JSON. - Confirm the export.
The system exports the full application without rule data as a JSON file.
Export partial or delta content
- Open
Admin Console > System Settings. - Keep
Exportselected. - Choose the application in
Selected Application. - In
Export Application, selectPartial/Delta.
The system displays the full application structure.
Users can select specific components to export, such as:
- Selected Rule Maintenance Sets
- Selected Rule Sets
- Selected Decision Tables
- Selected Text Rules
Users can preview Decision Table records and Text Rule blocks using the eye icon.
- Click
Export as JSON. - Confirm the export.
The system exports the selected components as a JSON file.
Import an application
- Open
Admin Console > System Settings. - Select
Import. - Click
Choose File. - Select the JSON file from your system.
- Click
Validate Document.
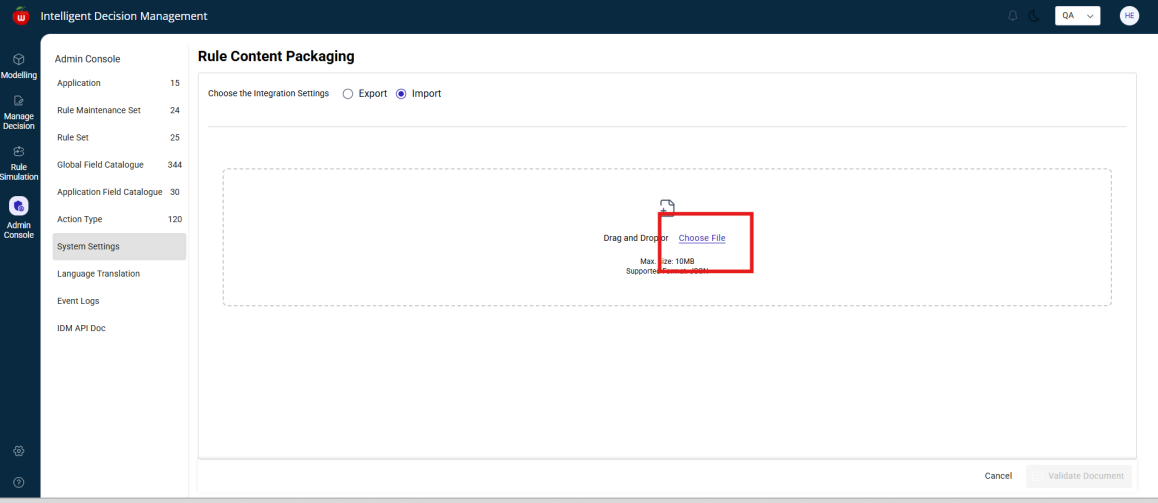
After successful validation, a confirmation message is displayed.
- Click
Import.
Import behavior:
- If the JSON contains partial data, only the partial data is imported
- If the JSON contains complete rule data, all rules are imported
- If the JSON contains no rule data, only the non-rule application structure is imported