SAP Environment Prerequisite
SAP Cloud Foundry Account
SAP Services Needed
- HANA DB
- XSUAA
Java Application Deployment
Step 1: Creation of branch
Create new branch tagging to production code.
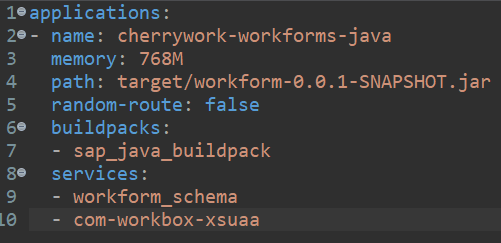
Step 2: Manifest File Configuration
Configure SAP service bindings in the manifest.yaml file.
Step 3: DB Configuration
Change the database configuration in the application.properties file.

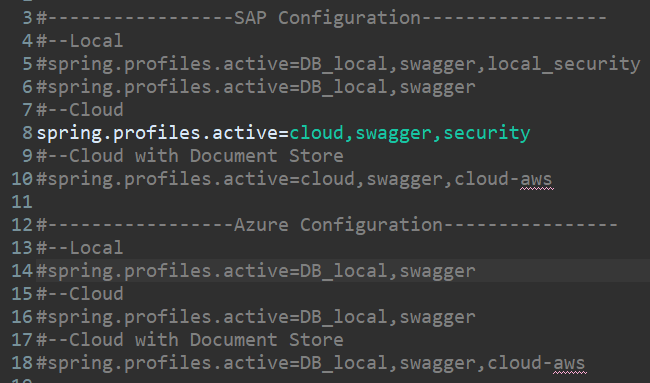
Step 4: Profile selection in application.properties
Uncomment line no 7 in application.properties file under SAP Configuration, make sure all lines under Azure Configuration are commented.
Step 5: Deploy WorkForms Java Application
You will need the cloud foundry command line interface (CF CLI) to deploy and manage your cloud foundry applications.
Open the terminal at the project location.
Use the below commands in the command prompt.
cf api <api-endpoint>
cf login
Select the organization and space in which the application needs to be deployed.
cf push
Step 6: Execute the DB Scripts
After the application is successfully deployed, the tables for WorkForms will be generated.
We need to import a few master data.
INSERT INTO CW_FORM_BUSINESS_MASTER (BUSINESS_ID, BUSINESS_DESCRIPTION, BUSINESS_LABEL, BUSINESS_NAME, CREATED_BY, CREATED_ON, IS_ACTIVE, IS_DELETED, MODIFIED_BY, MODIFIED_ON) VALUES('503', 'CherryWorks', 'CherryWorks', 'CherryWorks', 'System', '2021-02-23 06:12:52.285000000', true, false, 'System', '2021-02-23 06:12:52.285000000');

INSERT INTO CW_FORM_BUSINESS_MASTER_CATEGORY (BUSINESS_CATEGORY_ID, BUSINESS_CATEGORY_DESCRIPTION, BUSINESS_CATEGORY_LABEL, BUSINESS_CATEGORY_NAME, BUSINESS_ID, CREATED_BY, CREATED_ON, IS_ACTIVE, IS_DELETED, MODIFIED_BY, MODIFIED_ON) VALUES('603', 'Intelligent Task Management', 'Intelligent Task Management', 'Intelligent Task Management', '503', 'System', '2021-02-23 06:16:39.666000000', true, false, 'System', '2021-02-23 06:16:39.666000000');

INSERT INTO CW_FORM_TYPE_CORE_MASTER (FORMTYPE_ID, CREATED_BY, CREATED_ON, FORMTYPE_ACCESS_TYPE, FORMTYPE_DESCRIPTION, FORMTYPE_LABEL, FORMTYPE_NAME, IS_ACTIVE, IS_DELETED, MODIFIED_BY, MODIFIED_ON) VALUES('15', 'System', '2021-02-23 06:04:01.262000000', 'all', 'ITM - Task Form New', 'ITM - Task Form New', 'ITM - Task Form New', true, false, 'System', '2021-02-23 06:04:01.262000000');
Step 7: Creation of Destination
Replace the application URL and tokenServiceURL with the respective deployed application URLs.
Replace clientId and clientSecret from XSUAA instance details.
{
  "Name": "WorkFormsServices",
  "Type": "HTTP",
  "URL": "https://workforms.cfapps.eu10.hana.ondemand.com/workforms",
  "Authentication": "OAuth2UserTokenExchange",
  "ProxyType": "Internet",
  "tokenServiceURLType": "Dedicated",
  "clientId": "sb-cwworkRules!t19391",
  "clientSecret": "od/tNBzVCJZOmPxYVWYdkSx6PZE=",
  "tokenServiceURL": "https://hrapps.authentication.us10.hana.ondemand.com/oauth/token",
  "Description": "WorkPlatform"
}
SAP CF DEPLOYMENT WITH DOCUMENT STORE
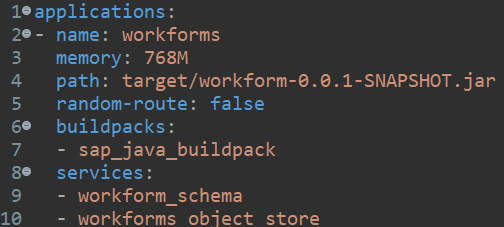
Create a Object Store service instance of plan s3-standard.
Replace workforms_object_store at line no 10 in manifest.yml file with the created instance name.

Uncomment commons-document-model dependency from pom.xml file.
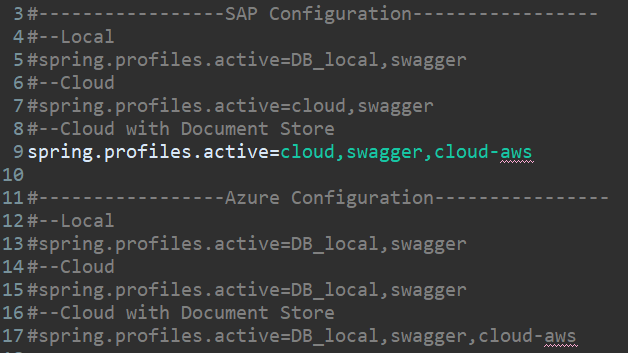
Uncomment line no 9 in application.properties file under SAP Configuration, make sure all lines under Azure Configuration are commented.
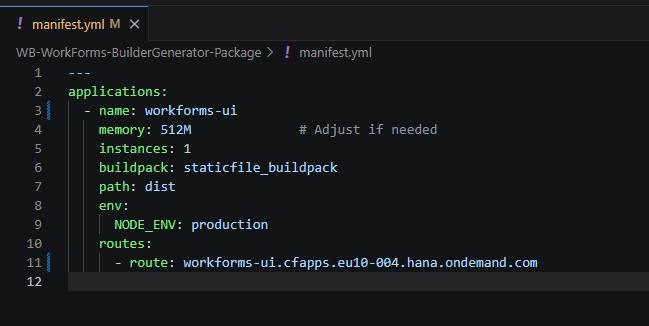
Frontend Deployment Steps
Open Command Prompt / Terminal at the root level of the project.
Build the Application:
npm run build
Log In to SBX BTP account:
cf8 login -a https://api.cf.eu10-004.hana.ondemand.com
Deploy the Application:
cf8 push
View deployed Applications:
cf8 apps
Installation
To install WorkForms, make sure you have .npmrc file with the private registry details.
If not, contact the WorkForms Team to get it.
Then install the package:
npm install @cw/cherrywork-workforms